사실, 이와 관련된 자료는 구글링을 하면 꽤 많이 검색된다. 참고로, OpenCV를 이용해 파이썬 기반에서 객체를 인식하는 방법도 유용하다.
머리말
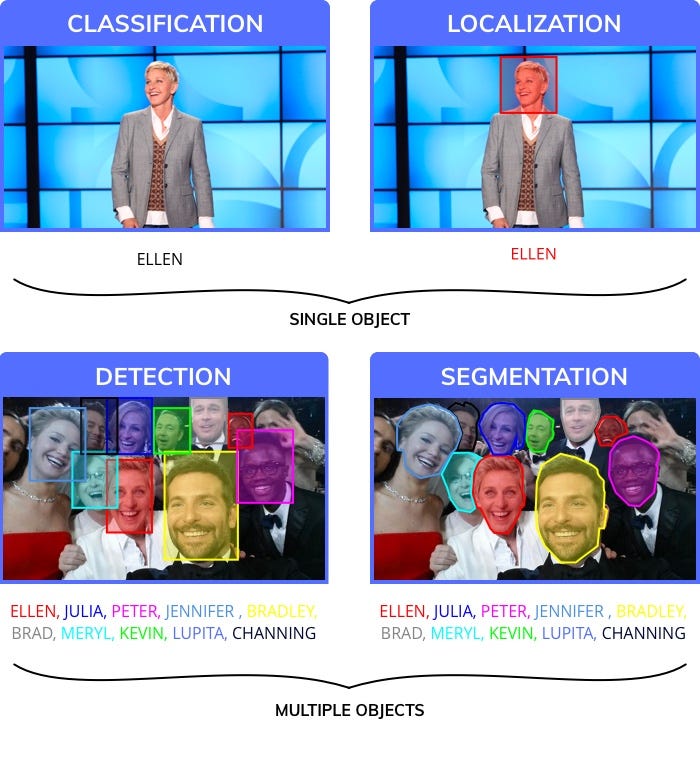
비전에서 객체 인식이란 다음과 같이 특정 이미지에서 원하는 객체 종류, 위치와 크기를 얻는 것이다.
객체 인식에서 유명한 방법인 YOLO는 매우 빠른 방식으로 객체 탐색을 할 수 있다.
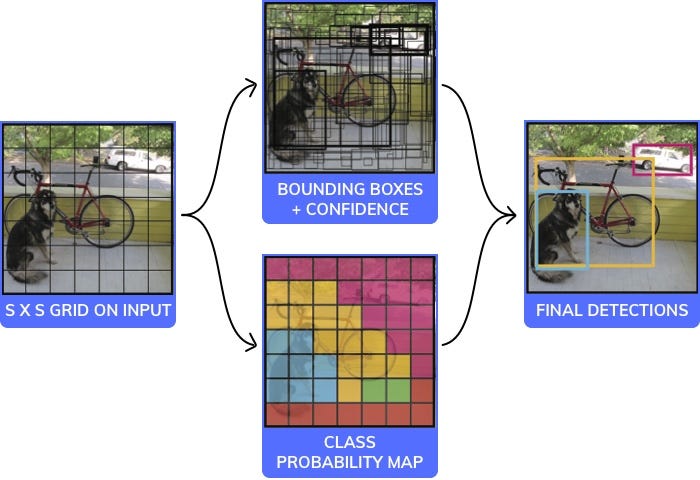
YOLO 알고리즘을 간단히 설명하면 다음과 같다.
image = readImage()
cells = 검색 셀 범위 설정
index = 0
for cell in cells
maxPrediction = 0.0
for region in cell.region
cell_image = image.getRegionImage(region)
prediction[index] = prediction(cell_image)
if(maxPrediction < prediction[index])
maxPrediction = prediction[index]
region = cell.grow(region)
else
index++
break
의사코드는 다음과 같다.
1 2 3 4 5 6 7 8 9 10 11 12 13 14 15 16 17 18 19 20 21 22 23 24 25 26 27 28 29 30 31 32 33 34 35 36 37 38 39 40 41 42 43 44 45 46 47 48 49 50 51 52 53 54 55 56 57 58 59 60 61 62 63 | #this is an Image of size 140x140. We will assume it to be black and white (ie only one channel, it would have been 140x140x3 for rgb) image = readImage() #We will break the Image into 7 coloumns and 7 rows and process each of the 49 different parts independently NoOfCells = 7 #we will try and predict if an image is a dog, cat, cow or wolf. Therfore the number of classes is 4 NoOfClasses = 4 threshold = 0.7 #step will be the size of step to take when moving across the image. Since the image has 7 cells step will be 140/7 = 20 step = height(image)/NoOfCells #stores the class for each of the 49 cells, each cell will have 4 values which correspond to the probability of a cell being 1 of the 4 classes #prediction_class_array[i,j] is a vector of size 4 which would look like [0.5 #cat, 0.3 #dog, 0.1 #wolf, 0.2 #cow] prediction_class_array = new_array(size(NoOfCells,NoOfCells,NoOfClasses)) #stores 2 bounding box suggestions for each of the 49 cells, each cell will have 2 bounding boxes, with each bounding box having x, y, w ,h and c predictions. (x,y) are the coordinates of the center of the box, (w,h) are it's height and width and c is it's confidence predictions_bounding_box_array = new_array(size(NoOfCells,NoOfCells,NoOfCells,NoOfCells)) #it's a blank array in which we will add the final list of predictions final_predictions = [] #minimum confidence level we require to make a prediction threshold = 0.7 for (i<0; i<NoOfCells; i=i+1): for (j<0; j<NoOfCells;j=j+1): #we will get each "cell" of size 20x20, 140(image height)/7(no of rows)=20 (step) (size of each cell)" #each cell will be of size (step, step) cell = image(i:i+step,j:j+step) #we will first make a prediction on each cell as to what is the probability of it being one of cat, dog, cow, wolf #prediction_class_array[i,j] is a vector of size 4 which would look like [0.5 #cat, 0.3 #dog, 0.1 #wolf, 0.2 #cow] #sum(prediction_class_array[i,j]) = 1 #this gives us our preidction as to what each of the different 49 cells are #class predictor is a neural network that has 9 convolutional layers that make a final prediction prediction_class_array[i,j] = class_predictor(cell) #predictions_bounding_box_array is an array of 2 bounding boxes made for each cell #size(predictions_bounding_box_array[i,j]) is [2,5] #predictions_bounding_box_array[i,j,1] is bounding box1, predictions_bounding_box_array[i,j,2] is bounding box 2 #predictions_bounding_box_array[i,j,1] has 5 values for the bounding box [x,y,w,h,c] #the values are x, y (coordinates of the center of the bounding box) which are whithin the bounding box (values ranging between 0-20 in your case) #the values are h, w (height and width of the bounding box) they extend outside the cell and are in the range of [0-140] #the value is c a confidence of overlap with an acutal bounding box that should be predicted predictions_bounding_box_array[i,j] = bounding_box_predictor(cell) #predictions_bounding_box_array[i,j,0, 4] is the confidence value for the first bounding box prediction best_bounding_box = [0 if predictions_bounding_box_array[i,j,0, 4] > predictions_bounding_box_array[i,j,1, 4] else 1] # we will get the class which has the highest probability, for [0.5 #cat, 0.3 #dog, 0.1 #wolf, 0.2 #cow], 0.5 is the highest probability corresponding to cat which is at position 0. So index_of_max_value will return 0 predicted_class = index_of_max_value(prediction_class_array[i,j]) #we will check if the prediction is above a certain threshold (could be something like 0.7) if predictions_bounding_box_array[i,j,best_bounding_box, 4] * max_value(prediction_class_array[i,j]) > threshold: #the prediction is an array which has the x,y coordinate of the box, the height and the width prediction = [predictions_bounding_box_array[i,j,best_bounding_box, 0:4], predicted_class] final_predictions.append(prediction) print final_predictions |
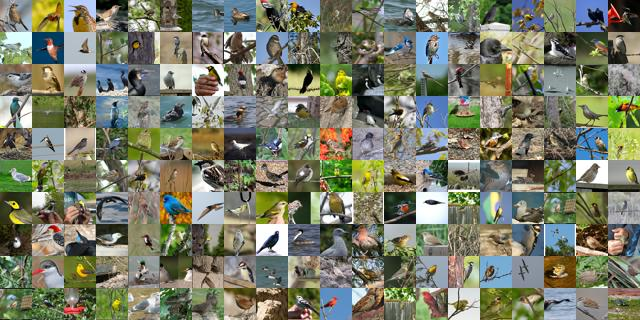
prediction함수는 딥러닝으로 훈련된 모델을 사용한다. 훈련 모델을 얻기위해서는 훈련 데이터를 미리 준비해야 한다. 준비 순서는 다음과 같다.
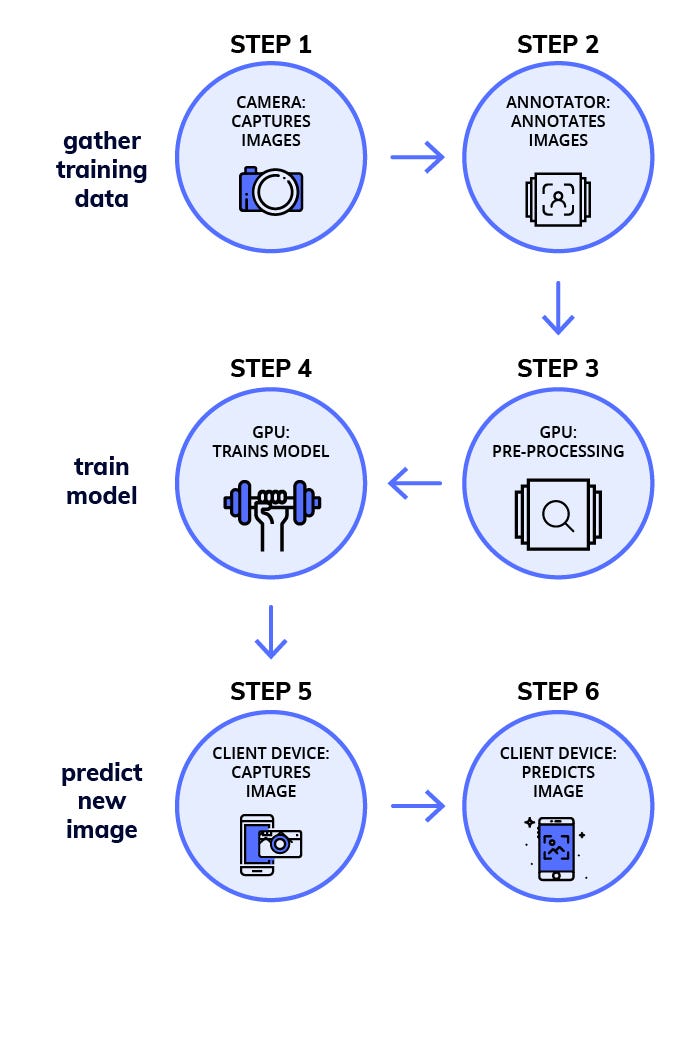
이 단계를 수행하기 위해서는 객체 당 100개 정도 수준의 데이터가 필요하다. 가능한 예측해야할 데이터와 비슷한 자료가 필요하다.
라벨링(labeling) - 주석달기
labelImg와 같은 도구를 이용해 이미지에 테두리 상자를 그리고, 라벨을 달아 놓는다. 사실 딥러닝 소스코드는 그리 어렵지 않은 수준이지만, 라벨링 작업은 매우 노동집약적이고 힘든 작업이다. 딥러닝 소스코드는 사실 이런 데이터가 된다.

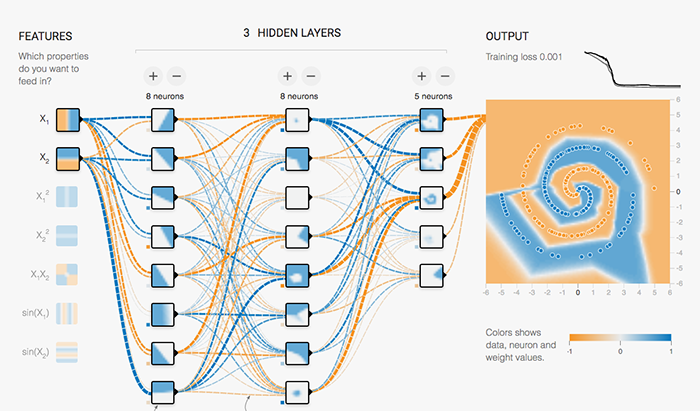
모델학습
보통 GPU가 달린 컴퓨터를 이용해 학습을 시킨다. 이미 CNN과 같이 딥러닝 이미지 인식용 모델은 공개된 것이 많다. 예제도 많으니 이런 것들을 사용해 학습시킨다.
혹시, 텐서플로우나 케라스를 설치하지 않았고, 설치하는 데 힘들다면, 다음과 같이 이미 만들어진 도커 이미지를 사용할 수도 있다. 사용방법은 여기를 참고한다.
sudo nvidia-docker run -p 8000:8000 -v `pwd`:data docker.nanonets.com/pi_training -m train -a ssd_mobilenet_v1_coco -e ssd_mobilenet_v1_coco_0 -p '{"batch_size":8,"learning_rate":0.003}'
학습된 모델 설명은 여기서 얻을 수 있다.
라즈베리파이 딥러닝 실행 속도 개선
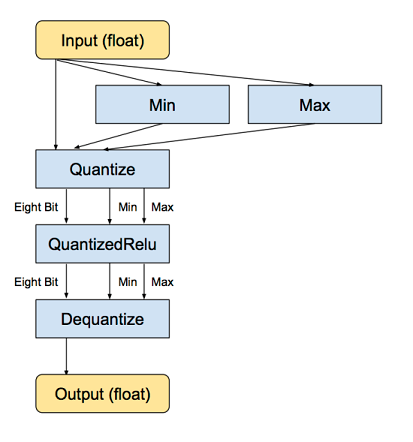
딥러닝 모델은 32비트 float 실수형 가중치로 구성된 행렬로 볼 수 있다. 딥러닝 모델 중 유명한 AlexNet은 크기만 거의 200MB이다. 이 행렬을 로딩해 실시간으로 계산한다는 것은 라즈베리파이 같은 임베디드 컴퓨터에서는 쉽지 않다.
이런 이유로 32비트 float을 양자화해 8비트 정수로 변환시켜 사용한다. 이 결과로 딥러닝 모델 크기는 75%가 줄어든다.
양자화 셀 스크립트는 다음과 같다.
1 2 3 4 5 6 7 8 9 10 11 12 | curl -L "https://storage.googleapis.com/download.tensorflow.org/models/inception_v3_2016_08_28_frozen.pb.tar.gz" | tar -C tensorflow/examples/label_image/data -xz bazel build tensorflow/tools/graph_transforms:transform_graph bazel-bin/tensorflow/tools/graph_transforms/transform_graph \ --in_graph=tensorflow/examples/label_image/data/inception_v3_2016_08_28_frozen.pb \ --out_graph=/tmp/quantized_graph.pb \ --inputs=input \ --outputs=InceptionV3/Predictions/Reshape_1 \ --transforms='add_default_attributes strip_unused_nodes(type=float, shape="1,299,299,3") remove_nodes(op=Identity, op=CheckNumerics) fold_constants(ignore_errors=true) fold_batch_norms fold_old_batch_norms quantize_weights quantize_nodes strip_unused_nodes sort_by_execution_order |
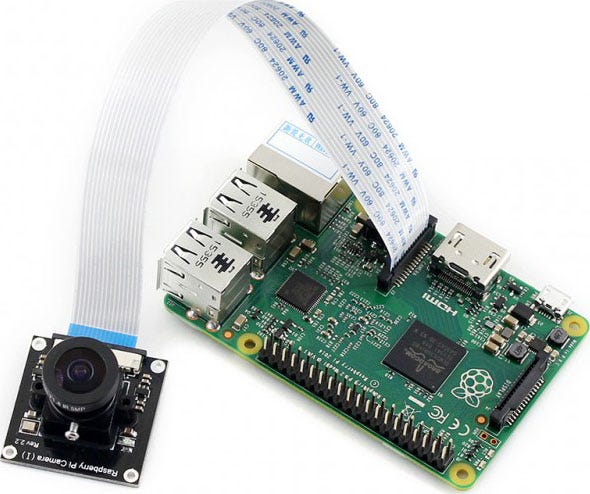
라즈베리파이 설정
라즈베리파이에 카메라를 설치한다.
import picamera, os
from PIL import Image, ImageDraw
camera = picamera.PiCamera()
camera.capture('image1.jpg')
os.system("xdg-open image1.jpg")
딥러닝 모델을 다운로드한다.
sudo nvidia-docker run -v `pwd`:data docker.nanonets.com/pi_training -m export -a ssd_mobilenet_v1_coco -e ssd_mobilenet_v1_coco_0 -c /data/0/model.ckpt-8998
라즈베리파이에 텐서플로우와 모델을 설치한다.
1 2 3 4 5 6 7 8 | sudo apt-get install libblas-dev liblapack-dev python-dev libatlas-base-dev gfortran python-setuptools libjpeg-dev sudo pip install Pillow sudo pip install http://ci.tensorflow.org/view/Nightly/job/nightly-pi-zero/lastSuccessfulBuild/artifact/output-artifacts/tensorflow-1.4.0-cp27-none-any.whl git clone https://github.com/tensorflow/models.git sudo apt-get install -y protobuf-compiler cd models/research/ protoc object_detection/protos/*.proto --python_out=. export PYTHONPATH=$PYTHONPATH:/home/pi/models/research:/home/pi/models/research/slim |
이제 모델을 실행해 이미지에서 객체를 인식해 보자.
python ObjectDetectionPredict.py --model data/0/quantized_graph.pb --labels data/label_map.pbtxt --images /data/image1.jpg /data/image2.jpg
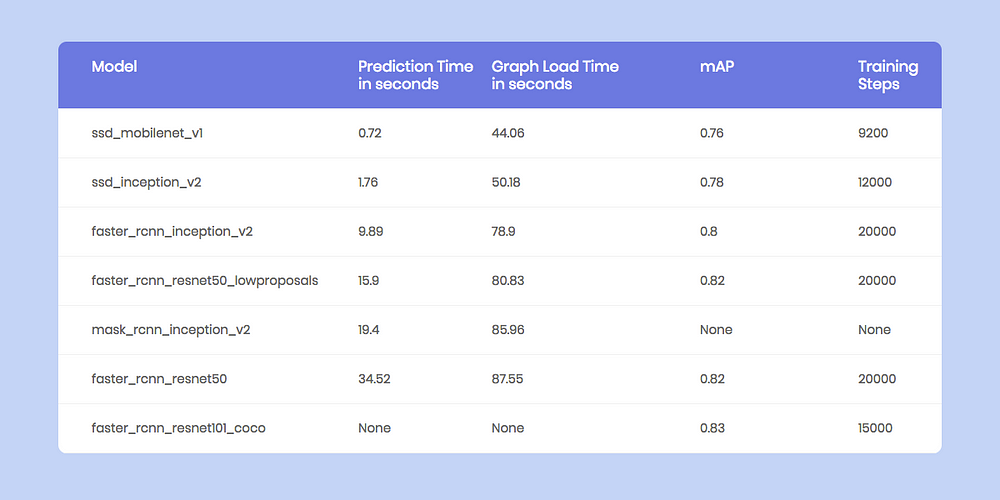
라즈베리파이에서 이미지 인식 성능은 다음과 같다. 예를 들어, raster RCNN은 초당 34.52 예측을 할 수 있다.
NanoNets 기반 예측
나노넷(NanoNets)은 앞의 준비과정보다 좀 더 단순하게 객체 인식을 할 수 있도록 해 준다. 나노넷은 GPU같이 값비싼 하드웨어가 필요없이 라즈베리파이 같은 장치에서도 사용하기 좋다.
다음은 나노넷의 간단한 예제이다.
1 2 3 4 5 6 7 8 9 10 11 12 13 14 15 16 17 18 19 20 21 22 23 24 25 | import picamera, json, requests, os, random from time import sleep from PIL import Image, ImageDraw #capture an image camera = picamera.PiCamera() camera.capture('image1.jpg') print('caputred image') #make a prediction on the image url = 'https://app.nanonets.com/api/v2/ObjectDetection/LabelFile/' data = {'file': open('image1.jpg', 'rb'), \ 'modelId': ('', 'YOUR_MODEL_ID')} response = requests.post(url, auth=requests.auth.HTTPBasicAuth('YOUR_API_KEY', ''), files=data) print(response.text) #draw boxes on the image response = json.loads(response.text) im = Image.open("image1.jpg") draw = ImageDraw.Draw(im, mode="RGBA") prediction = response["result"][0]["prediction"] for i in prediction: draw.rectangle((i["xmin"],i["ymin"], i["xmax"],i["ymax"]), fill=(random.randint(1, 255),random.randint(1, 255),random.randint(1, 255),127)) im.save("image2.jpg") os.system("xdg-open image2.jpg") |
나노넷에 대한 상세한 내용은 다음 링크를 참고한다.
- https://nanonets.com/object-detection-api/
- https://github.com/NanoNets/object-detection-sample-python
마무리
이 글에서는 라즈베리파이에서 딥러닝 모델을 실행해 객체 인식 탐색하는 방법을 알아보았다.
이 글의 코드는 다음 링크를 참고하길 바란다.
이 글에 대한 좀 더 상세한 내용은 다음 링크를 참고하길 바란다.
레퍼런스
1. Raspberry Pi: Deep learning object detection with OpenCV
2. How to easily Detect Objects with Deep Learning on Raspberry Pi
안녕하세요 대학생입니다.
답글삭제요번 과제로 이 프로젝트를 참고해도 될까요 ?
차량 인식말고 사람 안면 인식으로 인해 이미지를 구축하고 딥러닝 할려고 합니다.
네. 참고하셔도 됩니다.
삭제안녕하세요 대학생입니다
답글삭제졸업작품으로 이 프로젝트 참고할수있을까요?
차량인식이 아닌 쓰레기분류 이미지를 구축하고 딥러닝 하려합니다
네
삭제Hello, This is Future Dimension,
답글삭제we provide sposync.com to access to your device with
streaming and control using webRTC technology Free.
Only one required app is a web browser - Chromium and
provided python websocket server on RPI.
(tested for Buster and Chromium 72)
You can define the control command and extra security key if needed.
With these inputs, only you can access to your device remotely.
Please contact misdiva1bil@gmail.com
Thanks,
David FDI
RPI 탑재 Chromium 활용 원격 접속 제어 및 스트리밍 서비스 무료 - 앱 개발전 간단한 제어 명령만 정의되면 기능등 시험 가능 sposync.com https://youtu.be/3l2O2i6UX20