
레퍼런스
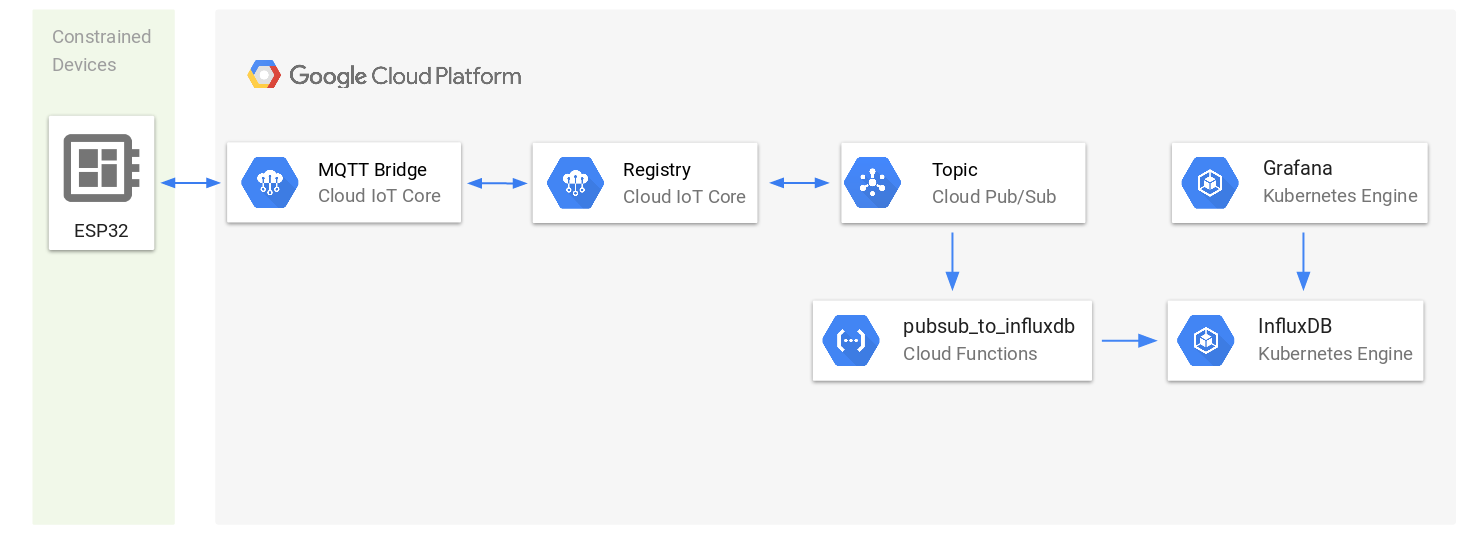
IoT - Using Cloud IoT Core to connect a microcontroller (ESP32) to the Google Cloud Platform
Build an IoT application with Google Cloud
function doGet(e)
{
  var mo = e.parameter.func;
  if(mo == "addData")
  {
    var stat = add_data(e);
    if(stat == 1)
    {
      var result =
      {
        status : true
      };
      return ContentService.createTextOutput(JSON.stringify(result)).setMimeType(ContentService.MimeType.JSON);
    }
  }
}
function add_data(e)
{
  var sheet = SpreadsheetApp.openByUrl('https://docs.google.com/spreadsheets/d/182EnOR4vF5eVs4wGD-zOn7pKy_6BMpED8ApjIGh0C9Q/edit#gid=0');
  var lastVal = sheet.getRange("A1:A").getValues();
  var id = lastVal.filter(String).lenght;

  var CurrentDate = new Date();
  var Date_ = Utilities.formatDate(CurrentDate, "IST", "dd/MM/YYYY");
  var Time_ = Utilities.formatDate(CurrentDate, "IST", "HH:mm:ss");

  sheet.appendRow([id, Date_, Time_, e.parameter.val]);
  return 1;
}
게시>웹 앱으로 배포 메뉴를 실행하고, 모두 접근 가능한 권한으로 배포한다.
#include <ESP8266WiFi.h>
#include <WiFiClientSecure.h>

const char *ssid = "SERVER NAME";
const char *password = "SERVER PASSWORD";
const char* host = "script.google.com";
const char* fingerprint = "89 ff f4 0f 4d 98 09 ed e3 ef 95 f2 8a af af 22 89 08 ac 03";
String url;

void setup()
{
  Serial.begin(115200);
  delay(100);
  Serial.println();
  Serial.println();
  Serial.print("Connecting to ");
  Serial.println(ssid);

  WiFi.begin(ssid, password);
  while (WiFi.status() != WL_CONNECTED)
  {
    delay(500);
    Serial.print(".");
  }

  Serial.println("");
  Serial.println("WiFi connected");
  Serial.println("IP address: ");
  Serial.println(WiFi.localIP());
  Serial.print("Netmask: ");
  Serial.println(WiFi.subnetMask());
  Serial.print("Gateway: ");
  Serial.println(WiFi.gatewayIP());
}

void loop()
{
  Serial.print("connecting to ");
  Serial.println(host);

  WiFiClientSecure client;

  const int httpPort = 443;
  if (!client.connect(host, httpPort))
  {
    Serial.println("connection failed");
    return;
  }

  float t = analogRead(A0);

  url = "/macros/s/AKfycbyvGjcryd7c5uNeX6dkleZhmjDKyTrs1L9Lf3kWlPhTZDn9JPrH/exec?func=addData&val="+ String(t);
  Serial.print("Requesting URL: ");
  Serial.println(url);

  client.print(String("GET ") + url + " HTTP/1.1\r\n" +
               "Host: " + host + "\r\n" +
               "Connection: close\r\n\r\n");
  delay(500);
  String section="header";
  while(client.available())
  {
    String line = client.readStringUntil('\r');
    Serial.print(line);
  }
  Serial.println();
  Serial.println("closing connection");
  delay(6000);
}
코드를 업로드하여 실행하면, 약 6초마다 NodeMCU에서 읽은 데이터가 스프레드시트에 업데이트되는 것을 확인할 수 있다.


1 2 3 4 5 6 7 8 9 10 11 12 13 14 15 16 17 18 19 20 21 22 23 24 25 26 27 28 29 30 31 32 33 34 35 36 37 38 39 40 41 42 43 44 45 46 47 48 49 50 51 52 53 54 55 56 57 58 59 60 61 62 63 64 65 66 67 68 69 70 71 72 73 74 75 76 77 78 79 80 81 82 83 | #include <ESP8266WiFi.h> #include <PubSubClient.h> const char* mqtt_server="test.mosquitto.org"; WiFiClient espclient; void callback(char* topic,byte* payload,unsigned int length1){ Serial.print("message arrived["); Serial.print(topic); Serial.println("]"); String data = ""; for(int i=0;i<length1;i++) data = data + payload[i]; Serial.println(data); Serial.println(payload[0]); if(payload[0] == 48) // if(data == "48") { digitalWrite(D4, LOW); //ASCII VALUE OF '0' IS 48 Serial.println("off"); } else if(payload[0] == 49) // else if(data == "49") { digitalWrite(D4, HIGH); //ASCII VALUE OF '1' IS 49 Serial.println("on"); } } PubSubClient client(mqtt_server,1883,callback,espclient); void setup() { pinMode(D2,OUTPUT); Serial.begin(115200); Serial.print("connecting"); WiFi.begin("ssid","pwd"); //SSID,PASSWORD while(WiFi.status()!=WL_CONNECTED){ delay(500); Serial.print("."); } Serial.println(); digitalWrite(LED_BUILTIN, HIGH); reconnect(); } void reconnect(){ while(WiFi.status()!=WL_CONNECTED){ delay(500); Serial.print("."); } while(!client.connected()){ if(client.connect("ESP8266Client123456789")){ Serial.println("connected"); client.subscribe("ledcontrol"); } else{ Serial.print("failed,rc="); Serial.println(client.state()); delay(500); } } } int now = 0; int lastMeasure = 0; void loop() { if(!client.connected()){ reconnect(); } client.loop(); // Timer variable with current time now = millis(); if (now - lastMeasure > 3000) { lastMeasure = now; int value = analogRead(A0); String data = String(value); client.publish("sensor/light", data.c_str()); } } |


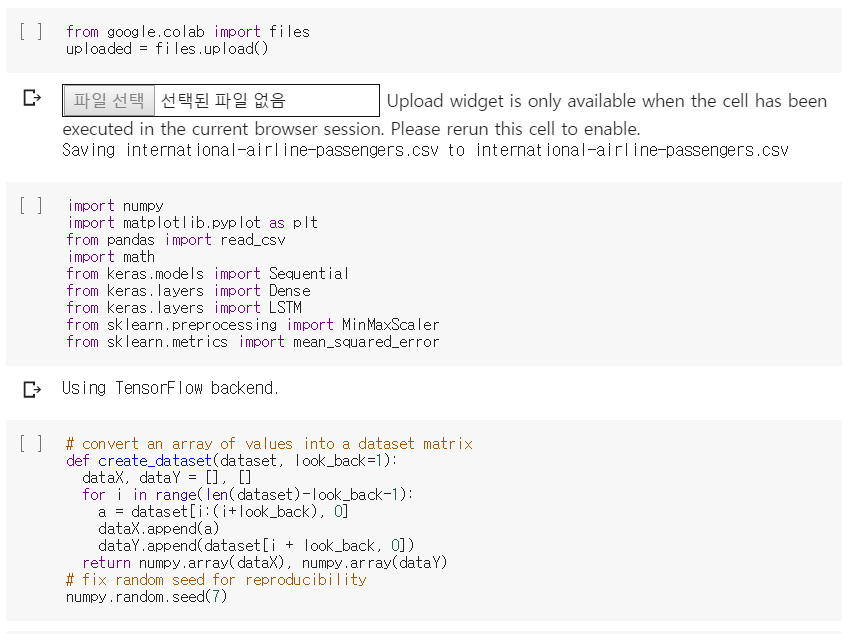


from google.colab import files코드를 COLAB으로 붙여넣기하고, 실행하면 다음과 같이 건축 객체를 인식하는 것을 확인할 수 있다.
uploaded = files.upload()

