
코덱스 코드 및 도구는 Github에 공개되었다.
Codex는 현재 ChatGPT Pro, Team, Enterprise 사용자에게 제공되며, Plus 및 Edu 사용자에게도 점차 확대되고 있다. 또한, Codex CLI를 통해 터미널 환경에서도 Codex의 기능을 활용할 수 있어, 다양한 개발 환경에서의 활용이 가능하다.(openai.com)
Codex를 활용한 전체 사용 과정은 단순한 코드 자동 생성 수준을 넘어, 실제 소프트웨어 개발의 전 과정을 자연어 기반으로 자동화하는 방식으로 개발되어 있다.
Codex 는 현재 github를 기본 연결해 사용하도록 되어 있어, 다음 본인의 github 프로젝트를 연결해 실습을 진행했음을 밝힌다.
- https://github.com/mac999/AI_agent_simple_function_call.git
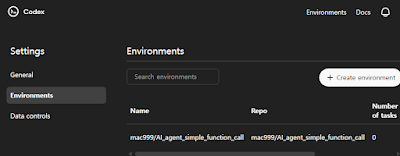
프로젝트 시작: 코드 저장소 구성 및 환경 연결
ChatGPT pro 좌측 메뉴에서 다음과 같이codex를 실행하면, 연결할 github 계정 및 저장소를 요청한다.

다음과 같이 본인의 github 계정을 연결한다.


자동 제안된 작업 중에 'Find and propose tasks for typo, bug, comments and test improvements'을 선택한다. 그럼 다음과 같은 상세 작업들을 codex가 설명해 준다.

처리 요청을 하면, 코덱스는 llm_func_call_for_ai_agent.py 같은 주요 파일과 README.md, tests/ 디렉토리를 포함하는 초기 구조를 설정한다. 코덱스가 생성한 코드 수정 전/후를 확인한 후 PR(Pull Request)를 요청한다.


자연어 명령을 통한 코드 작업 지시
Codex에 "코드베이스에서 버그를 찾아 수정해줘"와 같은 제안된 작업을 실행하면, Codex는 GitHub의 코드 구조를 분석해 변경 가능성이 있는 파일을 찾아낸다.

이 실습에서는 llm_func_call_for_ai_agent.py 파일 내부의 preprocess_code 함수에 NoneType 예외가 발생할 수 있는 위험을 식별했다.

Codex는 이 문제를 다음과 같이 자동 해결한다.
-
re.search()의 결과가None일 경우를 명시적으로 처리함. -
오류 메시지를 출력하고
return ""을 통해 안전하게 함수 종료. -
이 변경은 GitHub의 diff 뷰 상에서도 명확히 나타난다 (빨간색 삭제 라인과 초록색 추가 라인으로 표시됨).
또한, 이러한 수정은 Pull Request 형식으로 자동 정리된다. 사용자는 Codex가 제안한 수정을 검토하고 GitHub에서 수동으로 머지할 수 있으며, 필요시 코멘트나 수정 작업도 추가로 요청할 수 있다.
테스트 코드 자동 생성 및 실행
Codex는 코드 수정 후 테스트가 없다는 것을 감지하고, tests/test_preprocess_code.py 라는 유닛 테스트 스크립트를 새로 생성한다. 이 테스트는 unittest 프레임워크를 기반으로 구성되며, 문제의 함수(preprocess_code)가 다양한 입력에 대해 안정적으로 동작하는지를 확인한다.
사용자는 명시된 명령어인
python3 -m unittest tests/test_preprocess_code.py -v
를 통해 테스트를 실행하면 된다. 테스트가 성공적으로 통과하면, 해당 Pull Request에 테스트 결과가 함께 기록된다.
또한 ChatGPT Codex 웹 환경에서는 각 작업의 테스트 상태, 문제 발생 여부, 해결 내역까지 추적되며, 모든 변경 사항이 히스토리로 남는다.
에이전트 생성 기능 활용
Codex는 기능을 자동 생성하여 관련 소스 파일들을 추가할 수 있다. 이 예에서는 "ReAct 및 OpenAI API를 사용해서 에이전트를 만들어줘"라는 지시를 주었고, 이에 따라 Codex는 react_agent.py 파일을 새로 생성하였다.

이 파일에는 다음과 같은 핵심 기능이 포함된다:
ReAct 방식의 reasoning loop를 구성해, LLM이 도구를 통해 사용자 명령을 처리할 수 있도록 함.
OpenAI의 ChatCompletion API를 통해
tool_calls응답을 받아 동적으로search,calculator등 도구를 호출.CLI 환경에서 single query 모드 또는 chatbot 모드로 작동할 수 있도록 구성.
JSON 기반의 tool 호출 구조를 자동 파싱하여 함수 매핑에 전달.

이 코드는 실제로 CLI에서 실행 가능한 상태로, 사용자 질문에 따라 LLM이 적절한 함수를 찾아 실행하고 응답을 반환하는 구조를 완성한다.
이제 터미널에서 git pull 로 해당 생성된 코드를 로컬에 다운로드 받고, 로컬에서 필요한 작업들을 하면 된다.

Codex의 작업 관리 및 통합
Codex는 모든 작업 내역을 시간 순으로 정리하여 사용자에게 제공한다. 작업 목록에는 작업 이름, 처리된 커밋 수, 변경된 라인 수, 테스트 결과, 완료 여부(Merged) 등이 정리되어 있다. 이렇게 정리된 정보는 사용자 또는 팀이 코드 리뷰와 품질 관리를 효율적으로 수행할 수 있도록 한다.
Codex가 수행한 작업은 단순한 텍스트 생성이 아니라, 다음과 같은 고급 개발 활동을 포함한다.
-
문제 코드의 의미론적 분석
-
실제 코드 수정
-
기능 보완
-
테스트 자동화
-
CLI 도구 설계
-
Pull Request 생성 및 병합


- Lightweight coding agent that runs in your terminal
- CLI OpenAI Tool Like Claude Code
- OpenAI Codex CLI. Is a Lightweight Coding AI Agent
- Gemini CLI vs Claude CLI vs OpenAI CLI
- How to vibe code: 11 vibe coding best practices


