개발 방법
Vue는 자바스크립트와 Node.JS를 사용하므로 이를 미리 설치해야 한다. 이후, 개발 순서는 다음과 같다.
- Javascript Node.JS 설치
- MongoDB 이해: MongoDB introduction 참고
- MongoDB 설치: Install MongoDB 참고
- 예제 개발: Example - Simple MEVN 참고
Simple MEVN 예제는 To do list를 CRUD(create, read, update, delete)하는 웹 어플리케이션이다. 구조는 크게 두 부분으로 나뉘어져 있고, 다음과 같다.


- CRUD API + Express + Mongo DB server
- App Form UI + Vue server
참고로, 이 API 서버와 App 서버의 구조는 다음과 같다.

API서버 구조

App서버 구조
우선 CRUD API + MongoDB 서버부터 개발해 보자.
CRUD API 서버 개발
다음처럼 폴더와 파일을 만든다.
mkdir vurcrudappapi
cd vurcrudappapi
touch server.js
다음과 같이 API 기능을 제공할 폴더를 만든다.
mkdir api
mkdir api/controllers
mkdir api/models
mkdir api/routes
다음과 같이 파일을 만든다.
touch api/controllers/taskController.js
touch api/model/taskModel.js
touch api/routes/taskRoutes.js
다음과 같이 package.json 파일을 만든다.
npm init
그리고, 다음 패키지를 설치한다.
npm i express cors body-parser mongoose
npm i nodemon --save-dev
package.json 안의 scripts 부분을 다음처럼 수정한다.
"scripts": {
"start": "nodemon server.js"
},
taskController.js 파일을 다음과 같이 코딩한다.
const mongoose = require('mongoose');
const task = mongoose.model('task');
exports.list_all_tasks = (req, res) => {
task.find({}, (err, tasks) => {
if (err) res.send(err);
res.json(tasks);
});
};
exports.create_a_task = (req, res) => {
const newTask = new task(req.body);
newTask.save((err, task) => {
if (err) res.send(err);
res.json(task);
});
};
exports.read_a_task = (req, res) => {
task.findById(req.params.taskId, (err, task) => {
if (err) res.send(err);
res.json(task);
});
};
exports.update_a_task = (req, res) => {
task.findOneAndUpdate(
{ _id: req.params.taskId },
req.body,
{ new: true },
(err, task) => {
if (err) res.send(err);
res.json(task);
}
);
};
exports.delete_a_task = (req, res) => {
task.deleteOne({ _id: req.params.taskId }, err => {
if (err) res.send(err);
res.json({
message: 'task successfully deleted',
_id: req.params.taskId
});
});
};
taskModel.js 파일은 다음과 같이 코딩한다.
const mongoose = require('mongoose');
const { Schema } = mongoose;
const taskSchema = new Schema(
{
task1: {
type: String,
required: 'task1 cannot be blank'
},
task2: {
type: String,
required: 'task2 cannot be blank'
}
},
{ collection: 'task' }
);
module.exports = mongoose.model('task', taskSchema);
RoutesModel.js 파일을 다음과 같이 수정한다.
const taskBuilder = require('../controllers/taskController');
module.exports = app => {
app
.route('/tasks')
.get(taskBuilder.list_all_tasks)
.post(taskBuilder.create_a_task);
app
.route('/tasks/:taskId')
.get(taskBuilder.read_a_task)
.put(taskBuilder.update_a_task)
.delete(taskBuilder.delete_a_task);
};
다음과 같이 server.js 파일을 코딩한다.
const express = require('express');
const cors = require('cors');
const mongoose = require('mongoose');
const bodyParser = require('body-parser');
global.Task = require('./api/models/taskModel');
const routes = require('./api/routes/taskRoutes');
mongoose.Promise = global.Promise;
mongoose.set('useFindAndModify', false);
mongoose.connect(
'mongodb://localhost/Vuecrudapp',
{ useNewUrlParser: true }
);
const port = process.env.PORT || 3000;
const app = express();
app.use(cors());
app.use(bodyParser.urlencoded({ extended: true }));
app.use(bodyParser.json());
routes(app);
app.listen(port);
app.use((req, res) => {
res.status(404).send({ url: `${req.originalUrl} not found` });
});
console.log(`Server started on port ${port}`);
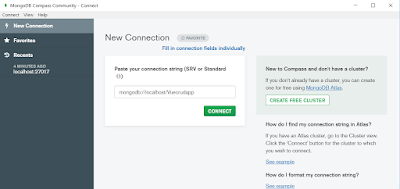
위의 mongoose.connect 함수는 Vuecrudapp 데이터베이스를 연결하는 역할을 한다. mongo Compass를 사용해 Vuecrudapp 데이터베이스가 생성된 후, Express app을 통해 bodyParser와 cors 미들웨어를 사용함을 설정한다.
이제 taskRoutes.js 에 정의된 코드를 통해 라우팅을 하고, 3000 번 포트를 통해 connection을 기다린다. 이제 Mongo DB를 실행한 후, 다음과 같이 npm을 통해 실행한다.
npm run start

서버 실행

API 및 MongoDB 서버
생성된 DB는 Mongo compass 프로그램을 사용해 내용을 확인할 수 있다. 아울러, Postman을 이용해 API를 확인할 수 있다.

APP 서버 개발
다음과 같이 Vue CLI 환경을 설치한다.
npm install -g @vue/cli
그리고, vuecrudapp 프로젝트를 다음처럼 생성한다.
vue create vuecrudapp
다음과 같이 실행하면, http://localhost:8080/ 에서 기본 Vue 인터페이스를 확인할 수 있을 것이다.
cd vuecrudapp
npm run serve
서버를 종료하고, 다음과 같이 폴더와 파일을 만든다.
cd src
touch components/TaskTest.vue
touch components/Taskform.vue
mkdir views
touch views/Edit.vue
touch views/New.vue
touch views/Show.vue
touch views/Test.vue
touch views/Tasks.vue
mkdir helpers
touch helpers/Helpers.js
touch Router.js
패키지를 설치한다.
npm i axios semantic-ui-css vue-flash-message
router.js 를 코딩한다.
import Vue from 'vue';
import Router from 'vue-router';
import Tasks from './views/Tasks.vue';
import New from './views/New.vue';
import Show from './views/Show.vue';
import Edit from './views/Edit.vue';
Vue.use(Router);
export default new Router({
mode: 'history',
base: process.env.BASE_URL,
linkActiveClass: 'active',
routes: [
{
path: '/',
redirect: '/tasks'
},
{
path: '/tasks',
name: 'tasks',
component: Tasks
},
{
path: '/tasks/new',
name: 'new-task',
component: New
},
{
path: '/tasks/:id',
name: 'show',
component: Show
},
{
path: '/tasks/:id/edit',
name: 'edit',
component: Edit
}
]
});
등록된 라우트의 의미는 다음과 같다.
/tasks - Mongo DB 데이터베이스의 모든 task를 표시한다.
/tasks/new - 새로운 task를 생성한다.
/tasks/:id - id에 해당하는 task를 표시한다.
/tasks/:id/edit - id에 해당하는 task를 수정한다.
다음과 같이 main.js 를 수정한다.
import Vue from 'vue'
import App from './App.vue'
import 'semantic-ui-css/semantic.css';
import router from './router'
new Vue({
router,
render: h => h(App),
}).$mount('#app')
app.vue를 수정한다.
<template>
<div id="app">
<div class="ui inverted segment navbar">
<div class="ui center aligned container">
<div class="ui large secondary inverted pointing menu compact">
<router-link to="/tasks" exact class="item">
<i class="tasks icon"></i> Tasks
</router-link>
<router-link to="/tasks/new" class="item">
<i class="plus circle icon"></i> New
</router-link>
</div>
</div>
</div>
<div class="ui text container">
<div class="ui one column grid">
<div class="column">
<router-view />
</div>
</div>
</div>
</div>
</template>
<script>
export default {
name: 'app'
};
</script>
<style>
#app > div.navbar {
margin-bottom: 1.5em;
}
.myFlash {
width: 250px;
margin: 10px;
position: absolute;
top: 50;
right: 0;
}
input {
width: 300px;
}
div.label {
width: 120px;
}
div.input {
margin-bottom: 10px;
}
button.ui.button {
margin-top: 15px;
display: block;
}
</style>
TaskForm.vue 를 수정한다.
<template>
<form action="#" @submit.prevent="onSubmit">
<p v-if="errorsPresent" class="error">Please fill out both fields!</p>
<div class="ui labeled input fluid">
<div class="ui label">
<i class="calendar plus icon"></i>task
</div>
<input type="text" placeholder="Enter task..." v-model="task.task1" />
</div>
<div class="ui labeled input fluid">
<div class="ui label">
<i class="info circle icon"></i> Details
</div>
<input type="text" placeholder="Enter Details" v-model="task.task2" />
</div>
<button class="positive ui button">Submit</button>
</form>
</template>
<script>
export default {
name: 'task-form',
props: {
task: {
type: Object,
required: false,
default: () => {
return {
task1: '',
task2: ''
};
}
}
},
data() {
return {
errorsPresent: false
};
},
methods: {
onSubmit: function() {
if (this.task.task1 === '' || this.task.task2 === '') {
this.errorsPresent = true;
} else {
this.$emit('createOrUpdate', this.task);
}
}
}
};
</script>
<style scoped>
.error {
color: red;
}
</style>
New.vue를 수정한다.
<template>
<div>
<h1>New task</h1>
<task-form @createOrUpdate="createOrUpdate"></task-form>
</div>
</template>
<script>
import taskForm from '../components/TaskForm.vue';
import { api } from '../helpers/helpers';
export default {
name: 'new-task',
components: {
'task-form': taskForm
},
methods: {
createOrUpdate: async function(task) {
const res = await api.createtask(task);
this.flash('task created', 'success');
this.$router.push(`/tasks/${res._id}`);
}
}
};
</script>
Edit.vue 를 수정한다.
<template>
<div>
<h1>Edit task</h1>
<task-form @createOrUpdate="createOrUpdate" :task=this.task></task-form>
</div>
</template>
<script>
import taskForm from '../components/TaskForm.vue';
import { api } from '../helpers/helpers';
export default {
name: 'edit',
components: {
'task-form': taskForm
},
data: function() {
return {
task: {}
};
},
methods: {
createOrUpdate: async function(task) {
await api.updatetask(task);
this.flash('task updated sucessfully!', 'success');
this.$router.push(`/tasks/${task._id}`);
}
},
async mounted() {
this.task = await api.gettask(this.$route.params.id);
}
};
</script>
Show.vue를 수정한다.
<template>
<div>
<h1>Show task</h1>
<div class="ui labeled input fluid">
<div class="ui label">
<i class="tasks icon"></i> Task
</div>
<input type="text" readonly :value="task.task1"/>
</div>
<div class="ui labeled input fluid">
<div class="ui label">
<i class="info circle icon"></i> Details
</div>
<input type="text" readonly :value="task.task2"/>
</div>
<div class="actions">
<router-link :to="{ name: 'edit', params: { id: this.$route.params.id }}">
Edit task
</router-link>
</div>
</div>
</template>
<script>
import { api } from '../helpers/helpers';
export default {
name: 'show',
data() {
return {
task: ''
};
},
async mounted() {
this.task = await api.gettask(this.$route.params.id);
}
};
</script>
<style scoped>
.actions a {
display: block;
text-decoration: underline;
margin: 20px 10px;
}
</style>
Tasks.vue를 수정한다.
<template>
<div>
<h1>tasks</h1>
<table id="tasks" class="ui celled compact table">
<thead>
<tr>
<th> <i class="calendar plus icon"></i>Task</th>
<th> <i class="info circle icon"></i>Detail</th>
<th> <i class="lock open icon"></i></th>
<th> <i class="edit icon"></i></th>
<th> <i class="trash icon"></i></th>
<th colspan="3"></th>
</tr>
</thead>
<tr v-for="(task, i) in tasks" :key="i">
<td>{{ task.task1 }}</td>
<td>{{ task.task2 }}</td>
<td width="75" class="center aligned">
<router-link :to="{ name: 'show', params: { id: task._id }}">Show</router-link>
</td>
<td width="75" class="center aligned">
<router-link :to="{ name: 'edit', params: { id: task._id }}">Edit</router-link>
</td>
<td width="75" class="center aligned" @click.prevent="onDestroy(task._id)">
<a :href="`/tasks/${task._id}`">Delete</a>
</td>
</tr>
</table>
</div>
</template>
<script>
import { api } from '../helpers/helpers';
export default {
name: 'tasks',
data() {
return {
tasks: []
};
},
methods: {
async onDestroy(id) {
const sure = window.confirm('Are you sure?');
if (!sure) return;
await api.deletetask(id);
this.flash('task deleted sucessfully!', 'success');
const newtasks = this.tasks.filter(task => task._id !== id);
this.tasks = newtasks;
}
},
async mounted() {
this.tasks = await api.gettasks();
}
};
</script>
API와 통신하기 위한 helpers.js 를 수정한다.
import axios from 'axios';
import Vue from 'vue';
import VueFlashMessage from 'vue-flash-message';
import 'vue-flash-message/dist/vue-flash-message.min.css';
Vue.use(VueFlashMessage, {
messageOptions: {
timeout: 3000,
pauseOnInteract: true
}
});
const vm = new Vue();
const baseURL = 'http://localhost:3000/tasks/';
const handleError = fn => (...params) =>
fn(...params).catch(error => {
vm.flash(`${error.response.status}: ${error.response.statusText}`, 'error');
});
export const api = {
gettask: handleError(async id => {
const res = await axios.get(baseURL + id);
return res.data;
}),
gettasks: handleError(async () => {
const res = await axios.get(baseURL);
return res.data;
}),
deletetask: handleError(async id => {
const res = await axios.delete(baseURL + id);
return res.data;
}),
createtask: handleError(async payload => {
const res = await axios.post(baseURL, payload);
return res.data;
}),
updatetask: handleError(async payload => {
const res = await axios.put(baseURL + payload._id, payload);
return res.data;
})
};
이제 APP 서버를 다시 실행하고, 크롬 브라우저에 접속하면 다음과 같은 화면을 볼 수 있다.

앱 서버 실행


실행 화면
MongoDB compass 를 통해 아래와 같이 생성된 database 내용을 확인할 수 있다.


생성된 DB 내용(MongoDB compass)
레퍼런스
댓글 없음:
댓글 쓰기