2020년 9월 18일 금요일

우분투에서 그래픽 기반 통합 개발환경 Eclipse, Sublime 설치 및 ROS 환경 설정

이 글은 우분투에서 그래픽 기반 통합 개발환경 설치하는 방법을 간단히 정리한다. 

이클립스 설치

Java를 설치한다.

sudo apt-get install default-jre
java -version

이 링크(www.eclipse.org/downloads/)에서 이클립스 설치 파일을 다운로드하고, 압축을 푼 후, 각 버전별로 설치한다.

 
다음과 같이 설치된 이클립스를 실행하고, 튜토리얼을 확인해 본다. 그리고, 프로젝트를 생성해 빌드해본다. 

이제 다음 링크를 참고해 ROS 개발환경을 설정한다.

http://wiki.ros.org/IDEs#Eclipse

서브라임 설치

sublime 편집기 설치 방법은 다음과 같다.

wget -qO - https://download.sublimetext.com/sublimehq-pub.gpg | sudo apt-key add -
sudo apt-add-repository "deb https://download.sublimetext.com/ apt/stable/"
sudo apt install sublime-text

subl

서브라임은 다양한 플러그인이 있어 이를 설치하면 개발에 필요한 거의 대부분의 작업을 편리하게 할 수 있다.

ctrl + shift + P 키를 클릭해 패키지 설치를 위해 package install 을 입력한다.

이제 다음 패키지를 입력해 각각 설치한다.

SlideBarEnhancements
Open folder

그리고, 편집기 메뉴의 view > side bar > show 클릭 후 왼쪽 사이트 뷰에, 편집하고자하는 파일들이 포함된 폴더를 드래그&드롭한다. 그럼 다음과 같이 편리하게 개발할 수 있다.


2020년 9월 17일 목요일

우분투 서버 원격 접속 시 필수적인 편집기 VIM 사용 방법

이 글은 우분투 서버 원격 제어를 위한 SSH에서 편집기 VIM 사용 방법을 간략히 정리한다. 

머리말

SSH는 윈도우 같은 클라이언트 컴퓨터에서 원격으로 같은 네트웍으로 묶여 있는 리눅스 서버를 제어하는 데 매우 편리하다. 하지만, GUI를 지원하지 않아, gedit 같은 편집기를 사용하기 어렵다(이 경우, x-server 에뮬레이션을 설치해야 한다). 

리눅스 서버에 원격으로 코딩을 하거나, 설정을 하는 경우, 편집기가 필수적인데, GUI가 없이 편리하게 사용할 수 있는 프로그램이 없으면 작업할 수가 없다. 이 경우 VI나 VIM을 사용한다.

VIM을 이용하면 왠만한 편집기 이상의 기능을 제공하여 편리하게 코딩이나 설정파일을 편집할  수 있다(VI보다 편리하다). 다만, 사용을 위해 몇가지 설정이 필요하다. 

설치 및 설정

다음 명령으로 VIM을 우분투에 설치한다.

sudo apt-get update
sudo apt-get install vim

편집기 컬러 설정을 다음과 같이 다운로드 받는다.
mkdir -p ~/.vim/colors
cd ~/.vim/colors
curl -O https://raw.githubusercontent.com/nanotech/jellybeans.vim/master/colors/jellybeans.vim

다음과 같이 편집기를 이용해 VIM 에디터를 설정한다. 참고로 "는 주석 표시이다.
sudo gedit ~/.vimrc
set number    " show line 
set ai            " auto indent
set si            " smart indent
set cindent           " c style indent
set shiftwidth=4    " auto indent space  4 column
set tabstop=4       " convert tab to 4 spaces
set expandtab 
set et
set ignorecase      " ignore case character
set hlsearch         " highlight for searching
set nocompatible   " enable arrow keys
set fileencodings=utf-8,euc-kr    " file save encoding as utf-8, euc-kr
set fencs=ucs-bom,utf-8,euc-kr   " korea text encoding as euc-kr, unicode
set bs=indent,eol,start    " enable backspace
set ruler                " show cursor on status line
set title                 " show title
set showmatch       " show match () {}
set wmnu              " enable auto complate when tab 
syntax on              " enable grammar highlight
filetype indent on   " highlight depending on file format
set mouse=a         " enable mouse position as cursor
colorscheme jellybeans

.vimrc를 저장한 후 다음과 같이 vim을 실행해보자. 코딩 전용 편집기처럼 문법에 따른 컬러와 각종 기능이 활성화될 것이다.
vim test.py

사용

vim 사용은 일반 편집기와는 다르다. 이는 원격에서도 사용할 수 있고, 그래픽이 없는 최소한의 자원에서도 사용할 수 있도록 단축키를 이용하도록 설계되었기 때문이다. 

vim은 편집기 명령 상태와 파일 편집 상태를 구분해 동작한다. 

vim을 실행하면 명령 상태이며, 이때 다음 명령을 실행해 파일을 저장, 종료, 라인 복사, 라인 붙여넣기, 라인 삭제 등을 수행할 수 있다. 

종료
:q

저장
:w

저장/종료
:wq

커서 이동
화살표 키 입력

커서있는 줄 복사
yy

블럭 복사 시작
v

블럭 복사 끝
y

커서 다음에 붙여 넣기
p

앞에서 문자열 찾기
/문자열

뒤에서 문자열 찾기
?문자열

뒤로 검색
n

앞으로 검색
N

문자열 old를 new로 변경
:%s/old/new

모든 문자열 old를 new로 변경
:%s/old/new/g

되돌리기(undo)
u

되돌린것 재 실행
ctrl + r

현재 폴더 출력
:cd

다음 명령을 입력하면 그때 편집상태가 된다. 이때는 텍스트를 입력, 수정할 수 있다. 

커서 앞에서 글자 입력 모드 전환
i
행 처음부터 입력 모드 전환
l

다시 명령 상태로 복귀하려면 ESC 키를 입력하면 된다.

마무리

이 글은 리눅서 서버에서 텔넷이나 SSH로 원격 접속 시 사용하는 대표적 편집기인 VIM에 대해 이야기해보았다. 이 프로그램은 Bram Moolenaar가 개발한 것으로 1991년에 발표되어 지금까지 널리 사용되는 오픈소스이다. VIM은 VI Improved의 약자로 최초는 1988년 아미가 커뮤터에서 개발하다 발전된 것이다. VIM은 VI에 비해 정규 표현식, 마우스, 맞춤법 검사, 문법 강조 등 기능이 있어 편리하다. 뿐만 아니라, 다음과 같은 스크립트를 지원해 편집을 자동화할 수 있다.

let i = 1
while i < 5
  echo "count is" i
  let i += 1
endwhile

서버를 원격으로 설정하거나 코딩할 경우, VIM은 필수 도구이다. 

2020년 9월 15일 화요일

우분투 서버 원격 제어를 위한 SSH 설치 및 윈도우 클라이언트 PowerShell 접속

이 글은 우분투 SSH 설치 및 윈도우 PowerShell 원격 접속에 관한 글이다. 

가끔 리눅스 서버를 만들다보면, 원격으로 서버 명령을 실행하고, 프로그램을 설치하고 싶을 때가 있다. 이러한 유지관리를 위해 보통 SSH, Telnet 등을 설치한다. 

머리말

SSH는 Secure Shell의 약자로, 암호화된 네트워크 프로토콜이다. 일반적으로 명령행에서 서버에 로그인해 원격으로 서버를 조작할 수 있다. 물론, 서버는 SSH 서버가 실행되고 있어야 한다.

SSH는 1995년 헬싱키 대학 연구자 Tatu Ylonen이 개발하였다. SSH의 목적은 TELNET, FTP 를 대치하는 것이었다. SSH는 오픈소스로 릴리즈되었고, 2006년 IETF(Internet Engineering Task Force)에서 SSH-2로 리비전되었다. SSH-2는 보안성이 더 강화된다. 1999년 OpenSSH가 개발되고, 2005년에는 운영체제 기본 기능으로 지원된다. 

SSH는 login, 호스트 리모트 컨트롤(Telnet기능), 명령 실행(rsh기능), 암호 인증, 터널링(tunneling), VPN, 서버 원격 모니터링, SFTP(SSH File Transfer Protocol) 등을 지원한다.

서버 SSH 설치

다음 명령을 리눅스 서버에서 입력해 ssh를 설치한다.
sudo apt-get install openssh-server
sudo apt-get install ssh
sudo systemctl enable ssh
sudo systemctl start ssh

다음 명령으로 설정을 변경할 수 있다. 파일안에는 사용 포트(기본 22번), 접속 주소, 공개키, 관리자 계정 루트 로그인 허용 옵션 등이 포함되어 있다. 설정 후 sudo service ssh restart를 한다.
sudo gedit /etc/ssh/sshd_config

방화벽에서 22번 포트를 허용한다.
sudo ufw enable
sudo ufw allow 22

ssh 설치 및 설정 후 테스트를 위해, 다음과 같이 ifconfig 명령 실행 후, 서버 IP를 확인한다.

클라이언트 윈도우 SSH 설치

다음 명령을 파워셀에서 입력해 ssh를 설치한다(참고).

Get-WindowsCapability -Online | ? Name -like 'OpenSSH*'
# This should return the following output:
Name  : OpenSSH.Client~~~~0.0.1.0
State : NotPresent
Name  : OpenSSH.Server~~~~0.0.1.0
State : NotPresent

# Install the OpenSSH Client
Add-WindowsCapability -Online -Name OpenSSH.Client~~~~0.0.1.0
# Install the OpenSSH Server
Add-WindowsCapability -Online -Name OpenSSH.Server~~~~0.0.1.0

# Both of these should return the following output:
Path          :
Online        : True
RestartNeeded : False

작동여부는 다음 명령으로 확인한다.

Test-NetConnection 128.30.1.1 -Port 22

만약 파워셀이 불편하다면, PUTTY 프로그램을 설치하여 SSH를 접속한다.

이제, 다음 메뉴에서 윈도우 방화벽에 SSH포트 22번을 열어준다.

시작-윈도우 시스템-제어판-시스템및보안-윈도우즈 방화벽-고급설정

고급설정에서 인바운드 규칙 선택 후, 작업 패널에서 새규칙을 선택해, 규칙 종류를 포트로 선택한다. 그리고, 허용할 포트번호를 다음과 같이 설정한다.

예) 22, 23, 80

클라이언트 접속 및 사용

윈도우즈에서 파워샐을 실행하고, ssh 계정@서버IP주소 를 다음과 같이 입력한다.

예) ssh ktw@172.30.1.24


sudo apt-get install 같은 명령을 입력해 보자. 잘 실행되는 것을 확인할 수 있다.

다만, 그래픽이 사용되는 프로그램 실행 시 QXcbConnection 에러가 발생한다. 이 경우는 X-server 에뮬레이션 윈도우 프로그램(VcXsrv, Xming 등)을 설치해야 한다. 

마무리
이 글에서는 SSH에 대해 정리하고, 예제를 설명하였다. 사실 전세계에서 사용되는 많은 서버는 리눅스를 기반으로 하고 있고 SSH는 기본으로 설치되어 있는 경우가 많다. SSH를 이용해 서버를 관리할 수도 있고, 해킹에 사용할 수도 있다는 것을 참고해야 한다. 
SSH 개발자는 이 기술을 이용해 많은 컨설팅과 사업을 하였고, 전세계에서 좋은 평판과 가치를 얻었다. 앞으로 오픈소스 기술은 더욱 확장될 것이고, SSH와 같은 도구의 사용 사례는 더욱 많아질 것이다.
Tatu Ylonen

레퍼런스

부록: Telnet설치

Telnet을 서버에 설치하는 순서는 다음과 같다.

sudo apt-get install xinetd telnetd
sudo gedit /etc/xinetd.conf

service telnet
{
    disable = no
    flags = REUSE
    socket_type = stream
    wait = no
    user = root
    server = /usr/sbin/in.telnetd
    log_on_failure = USERID
}

sudo gedit /etc/hosts.allow
in.telnetd: ALL

sudo /etc/init.d/xinetd restart

윈도우에서는 윈조우 기능 켜기/끄기 메뉴에서 텔넷 클라이언트 옵션을 체크하면 설치 된다. 그럼 파워셀에서 다음과 같이 텔넷 실행이 가능하다.

부록: 원격 파일 전송을 위한 ftp 설치 및 사용
리눅스 서버에서 원격으로 클라이언트에 파일을 다운로드, 업로드 하고 싶다면, ftp를 설치하거나 scp를 사용해야 한다. ftp설치는 다음과 같다.
sudo apt-get update
sudo apt-get install vsftpd
sudo cp /etc/vsftpd.conf /etc/vsftpd.conf.orig

다음과 같이 방화벽을 설치, 설정한다.
sudo apt-get install ufw
sudo ufw allow 20/tcp
sudo ufw allow 21/tcp
sudo ufw enable
sudo ufw status verbose

다음과 같이 설정 파일을 열어 수정한다.
sudo vim /etc/vsftpd.conf
...
anonymous_enable=NO
local_enable=YES
write_enable=YES
chroot_local_user=YES
...

$ sudo systemctl restart vsftpd

다음과 같이 원격으로 접속해 사용한다. 참고로, 명령어는 get(파일 다운로드), mget(다중파일 다운로드), put(파일 업로드), ls(폴더 검색), cd(폴더 이동)이다.
$ ftp -p 172.30.10.3
ftp> prompt
interactive mode off
ftp> cd folder
ftp> get test.txt
ftp> put test.txt upload.txt
ftp> mget *
ftp> bye

2020년 9월 12일 토요일

Sendmail로 자동 이메일 보내기

이 글은 웹서버에서 프로세스 실행 완료하면 이메일 보내는 방법을 간략히 설명한다. 


Sendmail 설치 및 설정
다음과 같이 sendmail을 설치한다.
$ sudo apt-get install sendmail

다음과 같이 dnl 문자로 주석을 설정한다. 
$ sudo vi /etc/mail/sendmail.mc
FEATURE(`no_default_msa')dnl
dnl DAEMON_OPTIONS(`Family=inet6, Name=MTA-v6, Port=smtp, Addr=::1')dnl
DAEMON_OPTIONS(`Family=inet,  Name=MTA-v4, Port=smtp, Addr=0.0.0.0')dnl
dnl DAEMON_OPTIONS(`Family=inet6, Name=MSP-v6, Port=submission, M=Ea, Addr=::1')dnl
dnl DAEMON_OPTIONS(`Family=inet,  Name=MSP-v4, Port=submission, M=Ea, Addr=0.0.0.0')dnl

$ sudo vi /etc/mail/access 
Connect:localhost.localdomain REPLAY
Connect:localhost RELAY
Connect:127.0.0.1 RELAY
Connect:192.168.0 REPLAY
Connect:test.com REPLAY

$ sudo vi /etc/mail/local-host-names
google.com
kict.re.kr
naver.com
daum.net
localhost
localhost.localdomain
ktw-desktop

다음과 같이 실행하고, 텔넷 등으로 접속한다. Sendmail이 출력되면 성공한 것이다.
$ sudo service sendmail restart
$ telnet localhost 25
Trying 127.0.0.1...
Connected to localhost.
Escape character is '^]'.
220 ubuntu ESMTP Sendmail 8.14.4/8.14.4/Debian-2ubuntu2.1; Fri, 10 Mar 2017 10:29:07 +0200; (No UCE/UBE) logging access from: localhost(OK)-localhost [127.0.0.1]


속도가 느리면 다음과 같이 설정한다. hostname은 hostnamectl 명령을 통해 얻는다.
$ sudo vi /etc/hosts 
127.0.0.1  localhost localhost.localdomain hostname

gmail 로 전송되는 경우, 스팸으로 처리된다. 이 경우, gmail 에서 특정 메일주소로 받은 메일을 스팸메일 예외처리하면 된다. 예외처리를 위해 필터 설정해, 스팸을 해제하면 된다. 

이제 다음과 같이 실행해 본다.
echo "Subject: sendmail test" | sendmail -v emailaddress@gmail.com

Sendmail 활용 파이썬 코딩
다음과 같이 파이썬 코딩한다.
from email.mime.text import MIMEText
from subprocess import Popen, PIPE

def send_email(to):
    msg = MIMEText("Finished image capture")
    msg["From"] = "pcdnet@tk"
    msg["To"] = "laputa999@gmail.com"
    msg["Subject"] = "Scan image capture"
    p = Popen(["/usr/sbin/sendmail", "-t", "-oi"], stdin=PIPE)
    p.communicate(msg.as_string())

이제 실행해 보면, 지메일에 메시지가 전송될 것이다.

Appendix - 프로세스 호출

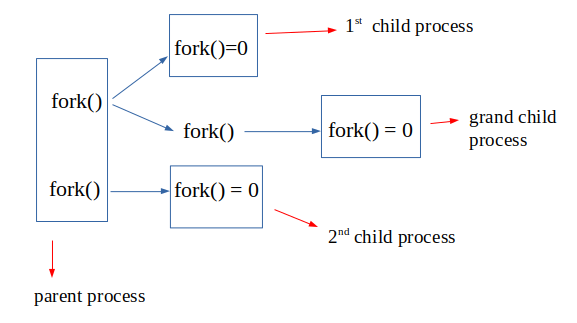
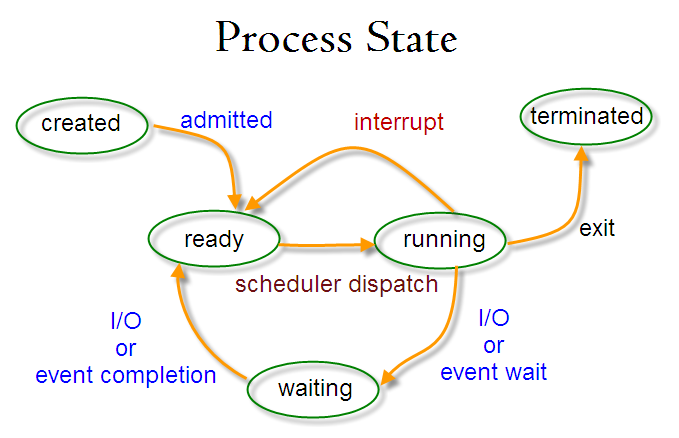
우선 웹서버에서 특정 이벤트가 발생했을 때, 이멜을 보낼려면 프로세스 호출에 대해 이해해야 한다. 프로세스 상태는 다음과 같다. 이때마다 시그널 콜백 함수를 이용해 이벤트를 받을 수 있다.


Appendix - 프로세스 시그널

프로세스가 종료할 때 등 이벤트가 발생하면, 시그널 콜백 함수에서 이를 확인할 수 있다.

signal.signal(signal.SIGHUP,CloseAll)
signal.signal(signal.SIGCHLD,CloseAll)
signal.signal(signal.SIGALRM,CloseAll)
 

다음은 간단한 시그널 예제이다.
from time import sleep
import signal
import sys

def sigterm_handler(_signo, _stack_frame):
    # Raises SystemExit(0):
    sys.exit(0)

if sys.argv[1] == "handle_signal":
    signal.signal(signal.SIGTERM, sigterm_handler)

try:
    print "Hello"
    i = 0
    while True:
        i += 1
        print "Iteration #%i" % i
        sleep(1)
finally:
    print "Goodbye"

#---
import signal
import time

class GracefulKiller:
  kill_now = False
  def __init__(self):
    signal.signal(signal.SIGINT, self.exit_gracefully)
    signal.signal(signal.SIGTERM, self.exit_gracefully)

  def exit_gracefully(self,signum, frame):
    self.kill_now = True

if __name__ == '__main__':
  killer = GracefulKiller()
  while not killer.kill_now:
    time.sleep(1)
    print("doing something in a loop ...")

  print("End of the program. I was killed gracefully :)")

Appendix - 예제

이 예제는 roscore를 자동으로 실행하고, rostopic을 실행한 후 10초 뒤에  kill하는 프로그래이다.

import subprocess
from time import sleep, time
import os, signal

def proc_ros():
    process = subprocess.Popen(['roscore'])
    print('1. process', process.pid)
    # process.wait(10)
    sleep(10)

def proc_roslaunch():
    process = subprocess.Popen(['roslaunch', 'rplidar_ros', 'rplidar.launch'])
    print('2. process', process.pid)
    #process.wait(10)
    sleep(10)

def term_proc():
    process = subprocess.Popen(['rostopic', 'echo', '/scan'])
    print('3. process', process.pid)
    sleep(10)
    for i in range(10):
        sleep(2)
        process.kill()
        print('Timed out - killing', process.pid)

def check_kill_process(pstring):
    for line in os.popen("ps ax | grep " + pstring + " | grep -v grep"):
        fields = line.split()
        pid = fields[0]
        os.kill(int(pid), signal.SIGKILL)

proc_ros();
proc_roslaunch();
term_proc()
sleep(10)
term_proc()
sleep(10)
print('End program')

레퍼런스

2020년 9월 10일 목요일

오픈소스 기반 Spot Dog 로봇 개발 방법 및 사례

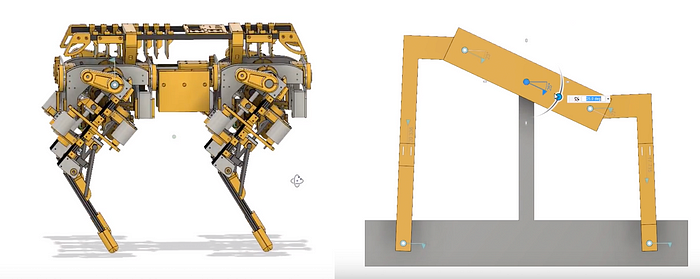
이 글은 보스톤 다이나믹스 Spot과 유사한 Dog 로봇 사례를 살펴보고 개발 방법을 간략히 정리한다.

로보틱스 분야도 많은 오픈소스 프로젝트가 기술 발전에 큰 기여를 하고 있다. ROS(Robot Operating System)과 같은 프로젝트는 이제 산업계 표준이 되어 버렸다. 

이미 boston dynamics에서 개발된 로봇은 플랫폼화되고 있다. 2020년에는 스팟 로봇을 제어할 수 있는 SDK를 오픈소스로 깃허브에 등록한 상황이다.
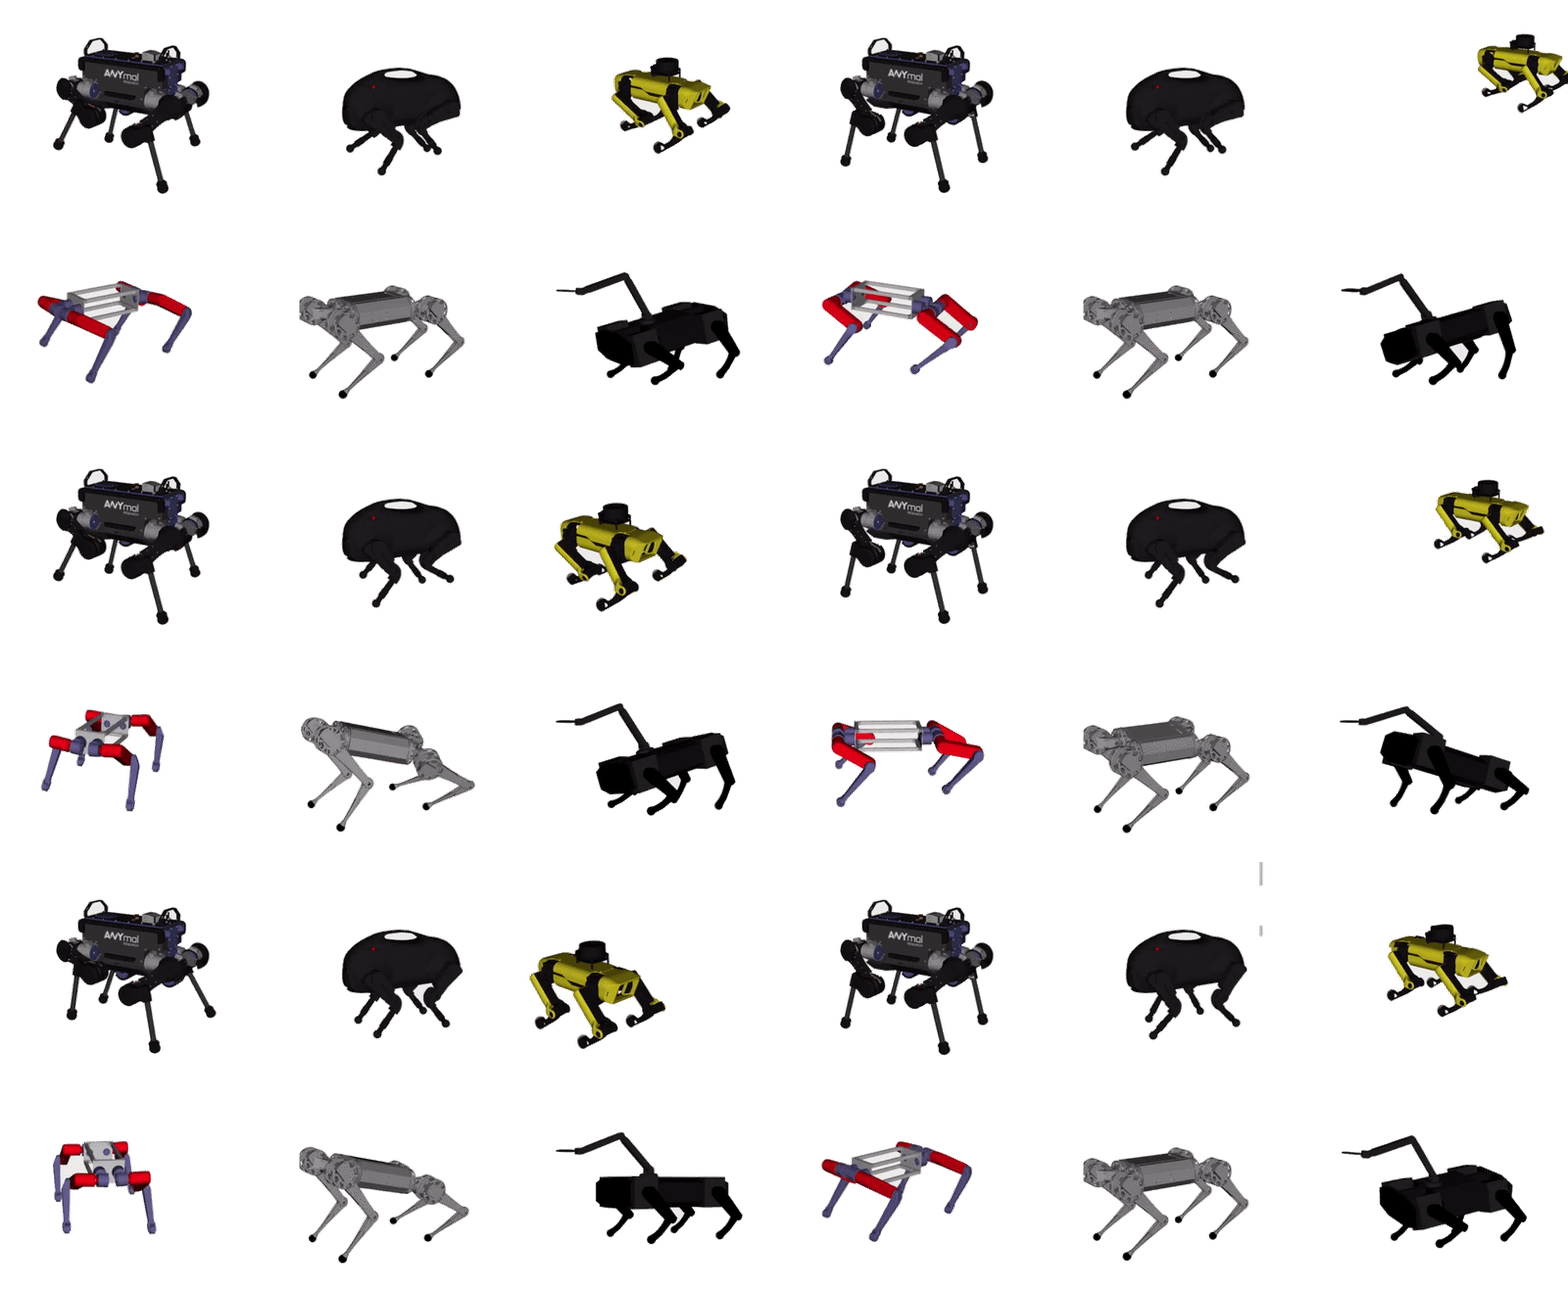
이런 상황에서 다이나믹에서 개발한 네발달린 개 로봇도 오픈소스 프로젝트로 진행되는 것이 점차 많아지고 있다. 다음은 그 사례를 보여준다. 


이제 사족 보행로봇도 aliexpress에서 저렴한 가격에 판매될 날이 머지 않은 것 같다.

2020년 9월 3일 목요일

딥러닝 강화학습 개념과 활용 예제

이 글은 강화학습(deep reinforcement learning) 개념과 활용 예제를 소개한다. 

개념

강화 학습은 일련의 결정을 내리기 위해 기계 학습 모델을 학습하는  것이다. 에이전트는 불확실하고 잠재적으로 복잡한 환경에서 목표를 달성하는 방법을 배운다. 강화 학습에서 인공 지능은 게임과 같은 상황에 직면한다. 컴퓨터는 시행 착오를 거쳐 문제에 대한 해결책을 제시한다. 기계가 프로그래머가 원하는 작업을 수행하도록하기 위해 인공 지능은 수행하는 작업에 대해 보상이나 벌금을 받는다. 목표는 총 보상을 극대화하는 것이다.

강화학습은 알파고로 인해 유명해졌다. 강화학습은 바둑과 같이 특정 규칙과 보상이 있는 상황인 경우 매우 적합한 딥러닝 모델이 된다. 이 경우, 굳이 노력이 많이 드는 학습 데이터를 직접 만들 필요가 없이, 규칙과 보상 알고리즘만으로 학습 데이터를 자동 생성할 수 있다. 

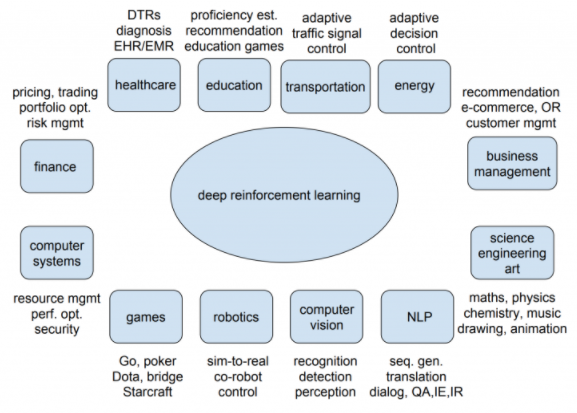
이런 이유로, 다음 그림과 같이 규칙이 있는 데이터 학습 모델 개발에 강화학습이 많이 활용된다. 

강화학습 유스케이스

강화 학습 설계자가 보상 정책, 즉 게임의 규칙을 설정하더라도 게임 해결 방법에 대한 힌트 나 제안을 제공하지 않는다. 완전한 무작위 시도부터 시작하여 정교한 전술과 기술로 마무리하는 등 보상을 극대화하기 위해 작업을 수행하는 방법을 알아내는 것은 모델에 달려 있다. 


강화학습된 블럭게임

강화 학습은 현재 기계의 창의성을 개발하는 가장 효과적인 방법이다. 인간과 달리 강화 학습 알고리즘이 충분히 강력한 컴퓨터에서 실행되는 경우 인공 지능은 수천 개의 게임 플레이에서 경험을 수집할 수 있다.

강화학습 개념

자율 주행차 제어는 ​​강화 학습 적용의 훌륭한 예이다. 이상적인 상황에서 컴퓨터는 자동차 운전에 대한 지시를 받지 않아야 한다. 

예를 들어, 일반적인 상황에서 안전을 최우선으로 생각하고, 승차 시간을 최소화하고, 오염을 줄이고, 승객에게 편안함을 제공하고, 법규를 준수하는 조건 하에 자율 주행 차량이 필요하다. 

프로그래머는 도로에서 일어날 수있는 모든 일을 예측할 수 없다. 프로그래머는 긴 "if-then"규칙을 작성하는 대신 보상 및 벌금 시스템에서 학습 할 수 있도록 강화 학습 에이전트를 준비할 수 있다. 에이전트(작업을 수행하는 강화 학습 알고리즘)는 특정 목표에 도달하면 보상을 받는다.

또 다른 예로 deepsense.ai는 가상 러너를 훈련시키는 것을 목표로 한다. Stanford Neuromuscular Biomechanics Laboratory 에서 설계한 정밀 근골격 모델에서 에이전트에게 달리는 방법을 배우는 것은 사람들의 보행 패턴을 자동으로 인식하고 조정하여 더 쉽고 효과적으로 움직이는 새로운 세대의 의족을 만드는 첫 번째 단계이다. 

탄광에서 가져온 과거 데이터를 분석하여 deepsense.ai는 위험한 지진이 발생하기 최대 8 시간 전에 예측할 수있는 자동화 시스템을 개발한 예가 있다. 지진 사건 기록은 몇 달 동안 데이터를 수집 한 24 개의 탄광에서 가져 왔다. 이 모델은 지난 24 시간 동안의 판독 값을 분석하여 폭발 가능성을 인식할 수 있었다.
강화 학습, 딥 러닝, 머신 러닝이 서로 연결되어 있지만, 다른 것을 대체 할 수는 없다.

강화학습 정책
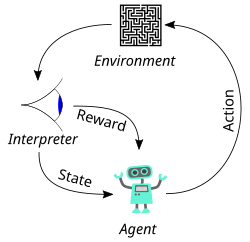
강화 학습 작업은 환경과 상호 작용하는 에이전트를 교육하는 것이다. 에이전트는 작업을 수행하여 상태라고 하는 다른 시나리오에 도달한다. 행동은 긍정적이고 부정적인 보상으로 이어진다.

에이전트의 목적은 에피소드 전체에서 총 보상을 극대화하는 것이다. 이 에피소드는 환경 내에서 첫 번째 상태와 마지막 또는 마지막 상태 사이에서 발생하는 모든 것을 의미한다. 경험을 통해 최상의 행동을 수행하는 방법을 배우도록 에이전트를 강화한다. 이것이 전략 또는 정책이다. 그러므로, 에이전트는 강화학습 목적에 맞게 코딩해야 한다. 에이전트와 보상 알고리즘에 따라 학습할 데이터를 자동 생성할 수 있다.

환경 내의 각 상태는 이전 상태의 결과이며 차례로 이전 상태의 결과이다. 짧은 에피소드가 있는 환경에서도 이 모든 정보를 저장하는 것은 불가능해진다.

이를 해결하기 위해 각 상태가 Markov 속성을 따른다고 가정한다. 즉, 각 상태는 전적으로 이전 상태와 해당 상태에서 현재 상태로의 전환에 의존한다. 이 정보만 저장하면 모든 상태를 저장해 메모리를 낭비할 필요가 없다.
학습
모든 단계에서 각 행동의 예상되는 보상을 알고 있다고 가정해 보겠다. 최대 총 보상을 생성하는 일련의 작업을 수행해야 한다. 이 총 보상을 Q-value라고하며, 다음과 같이 전략을 공식화한다.
위의 방정식은 상태 s에 있고 행동 a를 수행 하여 산출 된 Q- 값 이 즉각적인 보상 r (s, a) + 다음 상태 s ' 에서 가능한 가장 높은 Q- 값 이라는 것을 나타낸다. 여기서 감마는 향후 보상의 기여도를 제어하는 ​​할인 요소이다.


Q (s ', a)는 다시 감마 제곱 계수를 갖는 Q (s ", a)에 의존한다. 따라서 Q- 값은 다음과 같이 미래 상태의 Q- 값에 따라 달라진다. 감마 값을 조정하면 향후 보상의 기여도가 감소하거나 증가한다.

이것은 재귀 방정식이므로 모든 q- 값에 대해 임의의 가정을하는 것으로 시작할 수 있다. 경험을 바탕으로 최적의 정책으로 수렴한다. 실제 상황에서 이것은 업데이트로 구현된다.


여기서 알파는 학습률 또는 단계 크기이다. 이것은 단순히 새로 획득 한 정보가 이전 정보를 대체하는 정도를 결정합니다.

Deep Q-Network
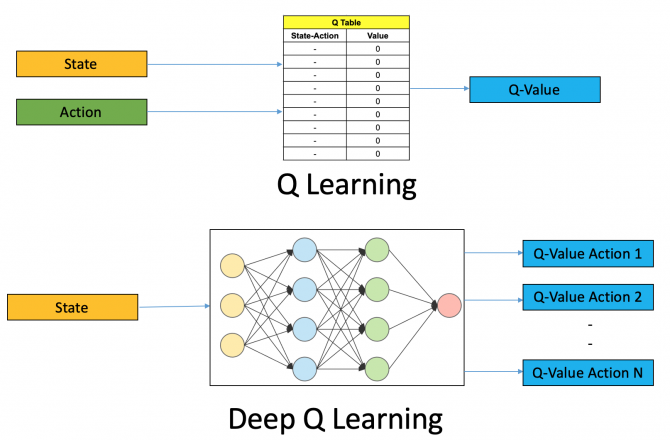
심층 Q 학습에서는 신경망을 사용하여 Q 값 함수를 근사한다. 상태는 입력으로 제공되고 가능한 모든 작업의 ​​Q- 값이 출력으로 생성된다. 

이 네트워크에서는 모든 과거 경험은 사용자가 메모리에 저장한다. 다음 동작은 Q- 네트워크의 최대 출력에 의해 결정된다. 여기서 손실 함수는 예측된 Q- 값과 목표 Q- 값 – Q *의 평균 제곱 오차이다. 이는 기본적으로 회귀 문제이다. 
녹색은 대상을 나타낸다. 이를 알고리즘으로 표현하면 다음과 같다.

예제
다음과 같이 간단한 강화학습 예제를 실행해 보자.
cd keras-rl
python setup.py install
pip install h5py
pip install gym

소스 코드는 다음과 같다. 
import numpy as np
import gym

from keras.models import Sequential                     # 케라스 모델 임포트
from keras.layers import Dense, Activation, Flatten
from keras.optimizers import Adam

from rl.agents.dqn import DQNAgent                    # 강화학습 에이전트, 정책, 메모리 
from rl.policy import EpsGreedyQPolicy
from rl.memory import SequentialMemory

ENV_NAME = 'CartPole-v0'

# Get the environment and extract the number of actions available in the Cartpole problem
env = gym.make(ENV_NAME)           # 훈련 환경 가져오기
np.random.seed(123)                      # 훈련 랜덤 데이터 생성
env.seed(123)
nb_actions = env.action_space.n

model = Sequential()                      # 딥러인 모델 작성
model.add(Flatten(input_shape=(1,) + env.observation_space.shape))   # 입력
model.add(Dense(16))                     
model.add(Activation('relu'))
model.add(Dense(nb_actions))
model.add(Activation('linear'))
print(model.summary())

policy = EpsGreedyQPolicy()            # 정책 알고리즘
memory = SequentialMemory(limit=50000, window_length=1)
dqn = DQNAgent(model=model, nb_actions=nb_actions, memory=memory, nb_steps_warmup=10, target_model_update=1e-2, policy=policy)   # 에이전트 설정
dqn.compile(Adam(lr=1e-3), metrics=['mae'])     # 최적화 모델 설정

# Okay, now it's time to learn something! We visualize the training here for show, but this slows down training quite a lot. 
dqn.fit(env, nb_steps=5000, visualize=True, verbose=2)      # 딥러닝

dqn.test(env, nb_episodes=5, visualize=True)      # 테스트

참고로, 다운로드 받은 github 의 예제 폴더에는 다양한 게임의 에이전트가 이미 구현되어 있어 쉽게 사용할 수 있다. 에이전트 및 정책을 재코딩하면 본인만의 강화학습모델을 개발할 수 있도록 모듈화되어 있다. 

다음 결과는 앞의 예제를 실행한 결과이다.
레퍼런스

2020년 8월 6일 목요일

OpenAI 기반 GPT3 와 BERT 설치, 미세조정(파인튜닝) 방법

이 글은 최근 큰 이슈가 되고 있는 자연어 처리 인공지능 모델인 OpenAI 기반 GPT3, BERT 설치 사용 방법을 간략히 나눔해 본다.

GPT3 installation

GPT 기반 개발
개념
GPT-3(Generative Pre-trained Transformer 3)은 OpenAI의 최신 언어 모델이다. 하나의 문장 뒤에 오는 문장을 예측하거나, 하나의 언어에서 다른 언어를 번역할 수 있다. 
GPT-3는 매우 큰 텍스트 데이터에서 훈련된 언어 모델이다. 작동은 간단하다. 텍스트를 제공하면 모델이 비슷한 스타일과 구조에 따라 문장을 생성합니다. 이를 이용해 챗봇 같은 것을 쉽게 개발할 수 있다. 다른 다양한 데모는 여기(예제)를 참고하라.


설치 및 사용
코딩은 Python 만 필요하다. 그러나 앱을 실행하려면 다음이 필요하다.
먼저 베타 테스트를 신청해 키값을 얻는다.

github에 있는 GPT3-Sandbox를 다운로드한다. 그리고, 다음을 실행한다.
1. 가상환경 생성
python -m venv $ENV_NAME

2. 가상환경 활성화
source $ENV_NAME/bin/activate 

3. 설치
pip install -r api/requirements.txt

다음과 같은 패키지 디펜던시 에러 발생 시 requirements.txt의 해당 패키지 버전을 낮추어 재실행해본다.
패키지 의존성 에러

해당 패키지 버전 다운

제대로 설치된 패키지

4. 보안키 추가
openai.cfg 파일을 생성하고 OPENAI_KEY=$YOUR_SECRET_KEY 를 파일 내에 추가함. $YOUR_SECRET_KEY 는 'sk-somerandomcharacters' 처럼 되어 있음. 참고로, 키가 제대로 설정되어 있지 않으면, 예제 실행 시 다음과 같은 에러가 발생함.

5. 환경 변수 설정
아래와 같이 환경변수openai.cfg 위치를 설정한다.
export OPENAI_CONFIG=/path/to/config/openai.cfg 

6. Yarn 설치
yarn install

이제 설치가 끝나면 다음과 같이 예제를 테스트해본다. 
python examples/run_latex_app.py

실행 결과는 다음과 같다.

관련 예제 사용은 여기서 방법을 확인할 수 있다.

간단한 예시
Python으로 OpenAI GPT-3 API를 사용하여 웹 데모를 만들어 본다. 이 예는 영어를 계산, 수식, LaTeX로 변환하기 위한 GPT 적용 예시이다. 다음과 같이 간단히 Example(Input, Output) 형식으로 예시를 만들어 주면, 비슷한 Input example에 유사한 Output을 대답해준다.

# Construct GPT object and show some examples
gpt = GPT(engine="davinci",
          temperature=0.5,
          max_tokens=100)
gpt.add_example(Example('Two plus two equals four', '2 + 2 = 4'))
gpt.add_example(Example('The integral from zero to infinity', '\\int_0^{\\infty}'))
gpt.add_example(Example('The gradient of x squared plus two times x with respect to x', '\\nabla_x x^2 + 2x'))
gpt.add_example(Example('The log of two times x', '\\log{2x}'))
gpt.add_example(Example('x squared plus y squared plus equals z squared', 'x^2 + y^2 = z^2'))

# Define UI configuration
config = UIConfig(description="Text to equation",
                  button_text="Translate",
                  placeholder="x squared plus 2 times x")

demo_web_app(gpt, config)

이 코드를 python 스크립트로 실행하면, 새로운 입출력을 테스트할 수 있는 웹 앱이 자동으로 시작된다. 참고로, examples 디렉토리에는 이미 3 개의 예제 스크립트가 있다. 

아래는 매우 간단한 사칙연산을 학습하는 예이다. 최소한의 예시로 계산기 모델을 제공한다.
# add some calculation examples
gpt.add_example(Example("add 3+5", "8"))
gpt.add_example(Example("add 8+5", "13"))
gpt.add_example(Example("add 50+25", "75"))

다음은 자연어를 SQL 언어로 변환하는 예이다. 
# Example
gpt.add_example(Example('Fetch unique values of DEPARTMENT from Worker table.', 
                        'Select distinct DEPARTMENT from Worker;'))
gpt.add_example(Example('Print the first three characters of FIRST_NAME from Worker table.', 
                        'Select substring(FIRST_NAME,1,3) from Worker;'))

# Question
prompt = "Display the lowest salary from the Worker table."
output = gpt.submit_request(prompt)
print(output.choices[0].text)
prompt = "Tell me the count of employees working in the department HR."
print(gpt.get_top_reply(prompt))

BERT 파인튜닝
BERT 모델을 이용해 NLP관련 데이터를 본인의 목적에 맞게 파인튜닝할 수 있다. 설치를 위해 다음을 실행한다.
pip install transformers

BERT 모델은 다음과 같이 초기화할 수 있다. 
config = BertConfig()
config.num_labels = num_labels
self.bert = BertModel(config)

BertConfig는 다음 하이퍼 파라메터를 가진다. 
BertConfig {
  "attention_probs_dropout_prob": 0.1,
  "classifier_dropout": null,
  "hidden_act": "gelu",
  "hidden_dropout_prob": 0.1,
  "hidden_size": 768,
  "initializer_range": 0.02,
  "intermediate_size": 3072,
  "layer_norm_eps": 1e-12,
  "max_position_embeddings": 512,
  "model_type": "bert",
  "num_attention_heads": 12,
  "num_hidden_layers": 12,
  "pad_token_id": 0,
  "position_embedding_type": "absolute",
  "transformers_version": "4.12.5",
  "type_vocab_size": 2,
  "use_cache": true,
  "vocab_size": 30522
}

우리는 사전정의된 BERT 기반 모델을 사용한다. 
from transformers import BertModel
model = BertModel.from_pretrained("bert-base-cased")

이 결과, 사전 학습 모델이 로딩된다. 가중치가 설정되었으므로, 파인튜닝(미세조정)이 가능한다. 

텍스트 입력은 각 단어가 토큰화되어 임베딩 처리되어야 한다. 
tokenizer = BertTokenizer.from_pretrained('bert-base-uncased')

예를 들어 문장이 아래와 같다면,
sentence = ‘I love kids’

토큰처리 한 결과는 다음과 같다.
tokens = tokenizer.tokenize(sentence)
print(tokens)
# [‘i’, ‘love’, ‘kids’]
tokens = [‘[CLS]’] + tokens + [‘[SEP]’]
# [‘[CLS]’, ‘[CLS]’, ‘i’, ‘love’, ‘kids’, ‘[SEP]’, ‘[SEP]’]
print(tokens)
tokens = tokens + [‘[PAD]’] + [‘[PAD]’]

처리되지 않아야하는 패딩 토큰은 attention_mask로 계산되지 않도록 한다.
attention_mask = [1 if i!= ‘[PAD]’ else 0 for i in tokens]
print(attention_mask)
# [1, 1, 1, 1, 1, 1, 1, 0, 0]

이를 임베딩으로 변환한 결과는 다음과 같다. 
token_ids = tokenizer.convert_tokens_to_ids(tokens)
# [101, 101, 1045, 2293, 4268, 102, 102, 0, 0]

이 값을 텐서로 변환한다.
token_ids = torch.tensor(token_ids).unsqueeze(0)
attention_mask = torch.tensor(attention_mask).unsqueeze(0)

Bert Model을 통해, 다양한 목적으로 파인튜닝 가능하다. 다음은 임상 데이터를 이용해, 환자에게 진료를 제안하는 모델을 학습하는 예시이다. 

import pandas as pd

X = """"
How do I use this inhaler?", Medication Inquiry
"What should I bring to my first visit?", General Inquiry
"Sore throat and runny nose", Symptom Check
"I have a fever and a cough", Symptom Check
"Do you offer COVID-19 vaccinations?", General Inquiry
"Do I need a prescription for this medicine?", Medication Inquiry
"I'd like to schedule a check-up" ,Appointment Booking
"I have a fever and a cough" ,Symptom Check
"Can you tell me about the side effects of this medication?", Medication Inquiry
"I'd like to schedule a check-up", Appointment Booking
"What are your opening hours?", General Inquiry
"Is this medication covered by insurance?", Medication Inquiry
"Can you tell me about the side effects of this medication?", Medication Inquiry
"Headache and dizziness", Symptom Check
"What are your opening hours?", General Inquiry
"Chest pain or discomfort", Symptom Check
"What are the alternatives to this drug?", Medication Inquiry
"Looking to book a follow-up appointment" ,Appointment Booking
"How do I use this inhaler?", Medication Inquiry
"Stomach pain and nausea", Symptom Check
"Is this medication covered by insurance?", Medication Inquiry
"Do I need a prescription for this medicine?", Medication Inquiry
"Are telehealth consultations available?", General Inquiry
"I'd like to schedule a check-up", Appointment Booking
"Stomach pain and nausea", Symptom Check
"Is this medication covered by insurance?", Medication Inquiry
"I want to see a dermatologist", Appointment Booking
"How do I use this inhaler?", Medication Inquiry
"Can I get a prescription refill?", General Inquiry
"Looking to book a follow-up appointment", Appointment Booking
"What are the alternatives to this drug?", Medication Inquiry
"I have a fever and a cough", Symptom Check
"Do I need a prescription for this medicine?", Medication Inquiry
"Can you tell me about the side effects of this medication?", Medication Inquiry
"I want to see a dermatologist", Appointment Booking
"Muscle aches and joint pain", Symptom Check
"How can I cancel my appointment?", General Inquiry
"Need to book an appointment for vaccination", Appointment Booking
"I want to see a dermatologist", Appointment Booking
"Do I need a prescription for this medicine?", Medication Inquiry
"Can you tell me about the side effects of this medication?", Medication Inquiry
"What are the alternatives to this drug?",Medication Inquiry
"Shortness of breath for two days", Symptom Check
"Persistent coughing", Symptom Check
"Fever with chills", Symptom Check
"Muscle aches and joint pain" ,Symptom Check
"Looking to book a follow-up appointment" ,Appointment Booking
"How do I use this inhaler?", Medication Inquiry
"Can you tell me about the side effects of this medication?", Medication Inquiry
"What are the alternatives to this drug?", Medication Inquiry
"I'd like to schedule a check-up" ,Appointment Booking
"What are the alternatives to this drug?", Medication Inquiry
"What should I bring to my first visit?", General Inquiry
"How do I use this inhaler?", Medication Inquiry
"Can you tell me about the side effects of this medication?", Medication Inquiry
"I'd like to schedule a check-up", Appointment Booking
"Shortness of breath for two days", Symptom Check
"Do I need a prescription for this medicine?", Medication Inquiry
"Are telehealth consultations available?", General Inquiry
"I want to see a dermatologist", Appointment Booking
"I have a fever and a cough", Symptom Check
"I want to see a dermatologist", Appointment Booking
"I need an appointment for a sore throat", Appointment Booking
"Sore throat and runny nose", Symptom Check
"Persistent coughing", Symptom Check
"What are the alternatives to this drug?", Medication Inquiry
"How do I use this inhaler?", Medication Inquiry
"I have a fever and a cough", Symptom Check
"What are the alternatives to this drug?", Medication Inquiry
"Looking to book a follow-up appointment", Appointment Booking
"How can I cancel my appointment?", General Inquiry
"Are telehealth consultations available?", General Inquiry
"Can I get a prescription refill?", General Inquiry
"What should I bring to my first visit?", General Inquiry
"Looking to book a follow-up appointment", Appointment Booking
"What insurances do you accept?", General Inquiry
"How do I book an appointment?", General Inquiry
"Can you tell me about the side effects of this medication?", Medication Inquiry
"Headache and dizziness" ,Symptom Check
"How do I use this inhaler?" Medication Inquiry
"Can you tell me about the side effects of this medication?", Medication Inquiry
"Can you tell me about the side effects of this medication?" ,Medication Inquiry
"What are the alternatives to this drug?", Medication Inquiry
"What insurances do you accept?", General Inquiry
"Can I get a prescription refill?" ,General Inquiry
"Can you tell me about the side effects of this medication?" ,Medication Inquiry
"Unexplained weight loss", Symptom Check
"I have a fever and a cough" ,Symptom Check
"What insurances do you accept?", General Inquiry
"Looking to book a follow-up appointment", Appointment Booking
"Can you tell me about the side effects of this medication?",Medication Inquiry
"Is this medication covered by insurance?", Medication Inquiry
"Fever with chills", Symptom Check
"Headache and dizziness", Symptom Check
"Do I need a prescription for this medicine?", Medication Inquiry
"Chest pain or discomfort",Symptom Check
"Need to book an appointment for vaccination", Appointment Booking
"Do I need a prescription for this medicine?", Medication Inquiry
"Looking to book a follow-up appointment" ,Appointment Booking
"What are your opening hours?", General Inquiry
"""

lines = X.strip().split("\n")

# 앞의 학습 데이터를 질문과 의도로 분리한다.
query = []
intent = []
for line in lines:
    parts = line.split(',')  # Split by comma
    if len(parts) >= 2:  # Ensure there are at least two parts
        # Strip leading/trailing spaces from each part and handle potential quotation marks
        query_part = parts[0].strip().strip('"')
        intent_part = parts[1].strip()

        query.append(query_part)
        intent.append(intent_part)
    else:
        print(f"Could not split line: {line}")

# 데이터 프레임 생성
df = pd.DataFrame({
    'query': query,
    'intent': intent
})

print(df)

# BERT 임포트
from transformers import BertTokenizer
from sklearn.model_selection import train_test_split
from torch.utils.data import TensorDataset, DataLoader, RandomSampler, SequentialSampler
import torch

tokenizer = BertTokenizer.from_pretrained('bert-base-uncased')

# 각 질문을 토큰처리함.
input_ids = []
attention_masks = []

for query in df['query']:
    encoded_dict = tokenizer.encode_plus(
        query,
        add_special_tokens=True,  # Add '[CLS]' and '[SEP]'
        max_length=64,  # 최대 문자열 크기 설정
        pad_to_max_length=True,
        return_attention_mask=True,  # Construct attention masks
        return_tensors='pt',  # Return pytorch tensors
    )
    input_ids.append(encoded_dict['input_ids'])
    attention_masks.append(encoded_dict['attention_mask'])

# 텐서로 변환
input_ids = torch.cat(input_ids, dim=0)
attention_masks = torch.cat(attention_masks, dim=0)
labels = torch.tensor(df['intent'].factorize()[0])  # Convert textual labels to integers

# 데이터셋을 학습, 검증용으로 분리
train_inputs, validation_inputs, train_labels, validation_labels = train_test_split(input_ids, labels, random_state=2018, test_size=0.1)
train_masks, validation_masks, _, _ = train_test_split(attention_masks, labels, random_state=2018, test_size=0.1)

# 학습 데이터셋 생성
train_data = TensorDataset(train_inputs, train_masks, train_labels)
train_sampler = RandomSampler(train_data)
train_dataloader = DataLoader(train_data, sampler=train_sampler, batch_size=32)

# 테스트 검증 데이터셋 생성
validation_data = TensorDataset(validation_inputs, validation_masks, validation_labels)
validation_sampler = SequentialSampler(validation_data)
validation_dataloader = DataLoader(validation_data, sampler=validation_sampler, batch_size=32)

from transformers import BertForSequenceClassification, AdamW, BertConfig
from transformers import get_linear_schedule_with_warmup
import random
import numpy as np

epochs = 20

# Load BertForSequenceClassification, the pretrained BERT model with a single linear classification layer on top
model = BertForSequenceClassification.from_pretrained(
    "bert-base-uncased",  # Use the 12-layer BERT model, with an uncased vocab
    num_labels = len(df['intent'].unique()),  # 라벨 수
    output_attentions = False,  # 어텐션 가중치 리턴 여부
    output_hidden_states = False,  # 은닉상태 리턴 여부
)

model.cuda()

# 학습 최적화 솔류션 설정
optimizer = AdamW(model.parameters(),
                  lr = 2e-5,  # args.learning_rate
                  eps = 1e-8  # args.adam_epsilon
                )

# Total number of training steps is [number of batches] x [number of epochs]
total_steps = len(train_dataloader) * epochs

# Create the learning rate scheduler
scheduler = get_linear_schedule_with_warmup(optimizer,
                                            num_warmup_steps = 0,
                                            num_training_steps = total_steps)

import torch
epochs = 100

# Check if CUDA (GPU support) is available
device = torch.device("cuda" if torch.cuda.is_available() else "cpu")

for epoch in range(epochs):
    print(f"Epoch {epoch + 1}/{epochs}")
    print('-' * 10)

    # Set the model to training mode
    model.train()

    # Tracking variables
    total_train_loss = 0

    # Iterate over each batch of training data...
    for step, batch in enumerate(train_dataloader):
        # Progress update every 40 batches.
        if step % 40 == 0 and not step == 0:
            print(f"  Batch {step}  of  {len(train_dataloader)}.")

        # Unpack this training batch from our dataloader and copy each tensor to the GPU
        b_input_ids = batch[0].to(device)
        b_attention_mask = batch[1].to(device)
        b_labels = batch[2].to(device)

        # Always clear any previously calculated gradients before performing a backward pass
        model.zero_grad()

        # Perform a forward pass (evaluate the model on this training batch)
        outputs = model(b_input_ids,
                        token_type_ids=None,
                        attention_mask=b_attention_mask,
                        labels=b_labels)
        loss = outputs.loss

        # Accumulate the training loss over all of the batches so that we can
        # calculate the average loss at the end
        total_train_loss += loss.item()

        # Perform a backward pass to calculate the gradients
        loss.backward()

        # Clip the norm of the gradients to 1.0 to prevent "exploding gradients"
        torch.nn.utils.clip_grad_norm_(model.parameters(), 1.0)

        # Update parameters and take a step using the computed gradient
        optimizer.step()

        # Update the learning rate
        scheduler.step()

    # Calculate the average loss over the training data
    avg_train_loss = total_train_loss / len(train_dataloader)

    print(f"  Average training loss: {avg_train_loss:.2f}")


import torch
from transformers import BertForSequenceClassification

# Initialize and train the model
model = BertForSequenceClassification.from_pretrained("bert-base-uncased")
# Train the model...

# 학습 모델 저장
model_weights_path = "/content/model/model_weights.pth"
torch.save(model.state_dict(), model_weights_path)

from transformers import BertConfig

# Save the model's configuration
model_config_path = "/content/model/model_config.json"
model.config.save_pretrained(model_config_path)

# 파인튜닝된 학습 모델 테스트
import torch
from transformers import BertForSequenceClassification, BertTokenizer

# Load the model configuration and weights
model_config_path = "/content/model/model_config.json"
model_weights_path = "/content/model/model_weights.pth"

# Load the model configuration
model_config = BertConfig.from_pretrained(model_config_path)

model = BertForSequenceClassification(config=model_config)
model.load_state_dict(torch.load(model_weights_path))
model.eval()

tokenizer = BertTokenizer.from_pretrained("bert-base-uncased")

user_input = "Book appointment for me "
tokens = tokenizer.encode_plus(user_input, max_length=128, truncation=True, padding="max_length", return_tensors="pt")
with torch.no_grad():
    outputs = model(**tokens)
    logits = outputs.logits

predicted_label = torch.argmax(logits, dim=1).item()

intents = ["Medication Inquiry", "General Inquiry", "Symptom Check", "Appointment Booking"]
predicted_intent = intents[predicted_label]

print("Predicted Intent:", predicted_intent)

기타, 다음은 QA 데이터를 학습하는 과정을 보여준다. 
from transformers import AutoTokenizer, AutoModelForSequenceClassification, AutoModelForQuestionAnswering

tokenizer = AutoTokenizer.from_pretrained("bert-base-uncased")

model = AutoModelForSequenceClassification.from_pretrained("bert-base-uncased", num_labels=2)

text = [
    "Jim Henson was a nice puppet.",
    "In fact Jim Henson was a nice puppet.",
    "I tell you Jim Henson really was just a nice puppet."
]

inputs = tokenizer(text, return_tensors="pt", padding=True, truncation=True)

output = model(**inputs)
print(output)

model = AutoModelForQuestionAnswering.from_pretrained("bert-base-uncased")

question = [
    "Who was Jim Henson?",
    "Who really was Jim Henson?",
    "Tell me who really was Jim Henson?"
]

text = [
    "Jim Henson was a nice puppet.",
    "In fact Jim Henson was a nice puppet.",
    "I tell you Jim Henson really was just a nice puppet."
]

inputs = tokenizer(question, text, return_tensors="pt", padding=True, truncation=True)

print(inputs)
print(tokenizer.batch_decode(inputs['input_ids']))

output = model(**inputs)
print(output)


BERT 동작 메커니즘 분석
토크나이저는 두 가지 주요 기능을 제공한다.
  • 원시 텍스트를 단어, 하위 단어 또는 문자 수준에서 토큰이라고 하는 더 작은 부분으로 분할한다.
  • 토큰을 기계 학습 모델이 이해할 수 있는 숫자 형식으로 변환한다.
텍스트를 하위 단어 단위로 분할하면 어휘 크기와 시퀀스 길이 사이의 균형이 잘 잡힌다. 또한 희귀하고 어휘가 없는 단어를 더 잘 처리하여 알 수 없는 토큰으로 처리할 필요성을 줄인다.
WordPiece는 BERT 토크나이저에서 사용되는 특정 하위 단어 토큰화 알고리즘으로, 텍스트 데이터 세트에서 점수가 가장 높은 문자 쌍을 선택하고 병합하는 프로세스를 통해 토큰의 어휘를 정의된 크기로 구축하도록 설계되었다. 이 점수는 개별 요소의 빈도 곱에 대한 쌍의 빈도의 비율이다.

score = (freq_of_pair) / (freq_of_first_element × freq_of_second_element)

여기서는 Hugging Face BERT Tokenizer의 인스턴스를 사용할 것이다. BERT 토크나이저에 전달된 텍스트는 일련의 토큰으로 나눈다. 어휘의 각 고유 토큰에는 정수 ID가 할당된다. 이것은 원-핫 인코딩된 벡터의 축약형 또는 추상화 역할을 한다.

원-핫 인코딩된 벡터는 표시되는 토큰에 해당하는 인덱스의 요소가 1의 값을 가지며 다른 모든 요소의 값이 0인 벡터일 뿐이다. 벡터의 길이는 텍스트 데이터셋의 어휘에 있는 토큰의 개수와 같다.

원-핫 인코딩된 벡터와 정수 ID는 모두 조회 테이블에서 해당 행을 선택하는 동일한 용도로 사용된다.

처리된 텍스트에는 세 가지 특수 토큰이 있다.
  • 분류 토큰: [CLS] 토큰은 시퀀스의 맨 처음에 배치됩니다. 전체 시퀀스에 대한 집계 표현 역할을 할 수 있다.
  • 분리 토큰: [SEP] 토큰은 시퀀스의 모든 문장 끝에 배치됩니다. 이를 통해 BERT는 문장을 구별하고 문장 경계를 이해할 수 있다.
  • 패딩 토큰: [PAD] 토큰은 시퀀스의 끝에 배치되어 일괄 처리의 모든 시퀀스 길이가 동일하도록 시퀀스 길이를 확장합니다. 이는 여러 샘플(배치)을 병렬로 처리할 수 있도록 한다. 이는 선형 대수학 계산 요구사항이다.
처리된 텍스트를 기반으로 하는 세 가지 유형의 정수 인코딩은 다음과 같다.
  • 입력 ID: BERT 기본 모델에는 30522개의 토큰으로 정의된 어휘가 있다. 각 고유 문자열 토큰은 고유한 정수 ID에 매핑됩니다.  
  • 주의 마스크: 정의된 최대 시퀀스 길이보다 짧은 시퀀스는 패딩 토큰으로 확장된다. 패딩 토큰은 자리 표시자일 뿐이며 모델의 출력에 영향을 주어서는 안 된다. 어텐션 마스크는 패딩 토큰을 나머지 모든 토큰과 구별된다. 패딩이 아닌 토큰의 인덱스에 있는 요소는 1의 값을 받고 패딩 토큰의 인덱스에 있는 요소는 0을 받다.
  • 토큰 유형 ID: 다음 문장 예측은 BERT 모델을 사전 학습할 때 수행되는 특수 작업이다. 시퀀스 입력은 두 문장으로 구성되도록 구성된다. 두 번째 문장은 원본 텍스트의 첫 번째 문장 바로 다음에 나오는 문장이거나 원본 텍스트의 임의의 문장이다. 목표는 두 번째 문장이 실제로 다음 문장인지 아니면 임의의 문장인지 예측하는 것이다. 토큰 유형 ID는 시퀀스에서 첫 번째 문장에 속하는 토큰과 두 번째 문장에 속하는 토큰을 각각 0과 1을 할당하여 지정한다. 다음 문장 예측을 수행하는 것이 아니라 시퀀스 분류라는 작업을 수행하기 때문에 시퀀스의 모든 토큰은 동일하게 처리되고 0으로 인코딩된다. 토큰 유형 ID는 시퀀스 분류를 수행할 때 모델 출력에 영향을 주지 않다.
임베딩은 토큰의 벡터 표현으로, 이를 통해 본질적으로 공간에서 토큰을 구성할 수 있다. 이상적으로 비슷한 의미의 토큰은 서로 더 가깝게 배치되고 다른 의미의 토큰은 더 멀리 떨어져 있다. 공간이 클수록 토큰을 정리할 수 있는 공간이 더 많아집니다.

임베딩 길이는 큰 어휘와 문맥 의미의 복잡성을 수용하기 위해 상대적으로 높게 설정된다. BERT 베이스의 임베딩 길이는 768이다.

각 토큰에 대해 다음 세 가지 임베딩이 생성되고 함께 추가된다.
  • 단어 임베딩: 각 입력 ID는 단어 임베딩 조회 테이블의 해당 행 벡터로 바뀝니다. 이 조회 테이블에는 어휘의 각 고유 토큰에 대해 하나의 행이 있다. BERT base의 어휘 크기는 30522이다.
  • 토큰 유형 임베딩: 토큰이 있는 문장(첫 번째 또는 두 번째)에 해당하는 이 조회 테이블에 두 개의 행만 있다는 점을 제외하고는 임베딩이라는 단어와 동일한 원칙이다. 이것은 다음 문장 예측의 사전 학습 작업에만 관련이 있음을 기억하십시오. 그렇지 않으면 모델 출력에 영향을 주지 않다.
  • 위치 임베딩: 위치 임베딩은 시퀀스에서 토큰의 순서에 대한 감각을 모델에 제공하는 역할을 한다. 조회 테이블에서 해당 위치 임베딩을 검색하는 데 사용되는 위치 ID는 각 시퀀스에 대해 동일한다 — 0에서 n까지의 연속 정수로 구성된 벡터, 여기서 n은 최대 시퀀스 길이이다. BERT 베이스의 최대 시퀀스 길이는 512이다.
이러한 세 가지 임베딩을 모두 추가하면, 정보의 다양한 측면이 단일 임베딩으로 인코딩된다. 이제 임베딩에는 시퀀스에 있는 토큰의 의미론적 의미, 시퀀스에서 토큰의 요소별 위치 및 토큰이 있는 문장에 대한 정보가 포함되었다. 

이러한 모든 임베딩은 대규모 텍스트 말뭉치에 대한 사전 학습 단계에서 학습되며 다운스트림 작업을 위해 추가로 미세 조정할 수 있다. 다음 코드는 임베딩을 구현한 것이다. 
class BertEmbeddings(nn.Module):
    def __init__(self, config):
        super().__init__()
        self.config = config
        self.word_embeddings = nn.Embedding(config.vocab_size, config.emb_size, padding_idx=config.pad_token_id)
        self.position_embeddings = nn.Embedding(config.max_seq_length, config.emb_size)
        self.token_type_embeddings = nn.Embedding(2, config.emb_size)
        self.LayerNorm = nn.LayerNorm(config.emb_size, eps=config.layer_norm_eps)
        self.dropout = nn.Dropout(config.dropout)
        
        # position ids (used in the pos_emb lookup table) that we do not want updated through backpropogation
        self.register_buffer("position_ids", torch.arange(config.max_seq_length).expand((1, -1)))

    def forward(self, input_ids, token_type_ids):
        word_emb = self.word_embeddings(input_ids)
        pos_emb = self.position_embeddings(self.position_ids)
        type_emb = self.token_type_embeddings(token_type_ids)

        emb = word_emb + pos_emb + type_emb
        emb = self.LayerNorm(emb)
        emb = self.dropout(emb)

        return emb

소스에서 config.pad_token_id는 단어 임베딩 조회 테이블에 제공되어 해당 행을 모두 0으로 설정하고 고정한다. 패딩 임베딩은 자리 표시자일 뿐이며 모델 출력에 영향을 미치지 않아야 한다. 

position_embeddings는 각 시퀀스에 대해 동일하다. 최대 시퀀스 길이가 512인 경우 0-511을 가진다. 이후, 레이어 정규화와 드롭아웃이 적용된다. 이렇게 하면 소실/폭발 그래디언트 문제를 처리하는 데 도움이 되며 안정적인 학습으로 이어진다.

드롭아웃으로 임베딩의 각 요소를 어느 정도의 확률(BERT의 경우 p=0.1)로 제로화하여 과적합을 방지한다. 결과적으로 모델은 새 데이터에 대해 더 잘 일반화된다. 

BERT기본 모델에는 12개 트랜스포머 레이어가 있는 인코더가 포함된다. 레이어는 서로 동일하며 한 레이어의 출력은 순차적으로 다음 레이어에 공급된다.

각 레이어에는 다중 헤드 셀프 어텐션(multi-headed self attention)과 포인트별 피드포워드 네트워크(point-wise feed forward network)가 있다. 인코더에 레이어가 많을수록 일반적으로 모델이 텍스트에서 더 복잡한 패턴과 관계를 학습할 수 있다. 이를 통해, 하위 계층 지역, 구문 관계, 중간 계층의 문장 수준, 의미 체계, 상위 계층의 문서 수준 관계를 학습한다.

멀티헤드 어텐션 
셀프-어텐션 메커니즘은 모델이 시퀀스에 있는 다른 모든 단어의 맥락에서 각 단어의 중요성을 평가할 수 있도록 한다. 이 프로세스를 통해 각 토큰의 임베딩 벡터는 주변 토큰과 어떻게 관련되는지에 대한 정보로 보강된다.

셀프 어텐션이 수행되기 전에 동일한 ID를 가진 모든 토큰은 시퀀스의 다른 토큰에 관계없이 동일한 임베딩을 갖다. 셀프 어텐션은 시퀀스의 각 토큰을 다른 모든 토큰과 비교한 다음 관련 관계 및 컨텍스트 정보로 각 토큰 임베딩 벡터를 보강한다.

각 토큰의 임베딩 벡터는 해당 차원을 유지하는 선형 계층을 통해 실행된다. 각각의 가중치(W)를 사용한 행렬 곱셈을 통해 토큰 임베딩을 Query, Key 및 Value 벡터에 프로젝션한다. 

내적은 두 벡터 간의 유사성 측도로 사용된다. 내적은 스칼라를 생성하며, 스케일러 값이 클수록 두 벡터가 더 유사한다.

행렬 곱셈을 사용하면 각 토큰의 내적을 다른 모든 토큰과 함께 한 번에 취할 수 있다. 키 행렬(K)은 행렬 곱셈 규칙으로 인해 전치(K^T)되어야 한다. 결과로 생성되는 QK의 각 행 벡터. T 행렬은 쿼리 행렬(Q)의 동일한 행 벡터(토큰)에 대응된다. 그리고 QK의 행 벡터에 있는 각 요소. T 행렬은 Q의 해당 토큰이 K의 동일한 시퀀스의 각 토큰과 얼마나 유사한지 알려준다.

쿼리(Q) 행렬에 키(K.T)를 곱하면 점수 유사도 행렬(QK)이 생성된다. 

유사도 점수는 K에 있는 벡터의 차원 크기의 제곱근으로 나뉜다. 패딩 토큰과 관련된 유사성 점수는 음의 무한대로 설정된다. softmax 함수는 행 차원을 따라 유사성 점수에 적용되어 1을 더하는 가중치의 확률 분포를 구한다.
softmax 함수를 적용하기 전에 유사성 점수를 축소하면 분포가 평활화되고, 역전파 중에 기울기가 사라지는 것을 방지할 수 있다.

스케일링된 유사성 점수 행렬에 값(V)을 곱하여 임베딩이 강화된다. 

이 평균값이 시퀀스의 특정 토큰이 다른 토큰에 주의를 기울이는 정도가 된다. 이를 가중치를 수정해 솔류션과 가깝게 되도록 학습한다.

이제 셀프 어텐션을 위한 코드가 어떻게 구현되는지 살펴보겠다.
class BertSelfAttention(nn.Module):
    def __init__(self, config, layer_i):
        super().__init__()
        self.config = config
        self.n_heads = config.n_heads[layer_i]
        self.head_size = config.emb_size // self.n_heads
        self.query = nn.Linear(config.emb_size, config.emb_size)
        self.key = nn.Linear(config.emb_size, config.emb_size)
        self.value = nn.Linear(config.emb_size, config.emb_size)
        self.dropout = nn.Dropout(config.dropout)


    def forward(self, emb, att_mask):
        B, T, C = emb.shape  # batch size, sequence length, embedding size   
    
        q = self.query(emb).view(B, T, self.n_heads, self.head_size).transpose(1, 2)
        k = self.key(emb).view(B, T, self.n_heads, self.head_size).transpose(1, 2)
        v = self.value(emb).view(B, T, self.n_heads, self.head_size).transpose(1, 2)
        
        weights = q @ k.transpose(-2, -1) * self.head_size**-0.5

        # set the pad tokens to -inf so that they equal zero after softmax
        if att_mask != None:
            att_mask = (att_mask > 0).unsqueeze(1).repeat(1, att_mask.size(1), 1).unsqueeze(1)
            weights = weights.masked_fill(att_mask == 0, float('-inf'))

        weights = F.softmax(weights, dim=-1)
        weights = self.dropout(weights)
        
        emb_rich = weights @ v
        emb_rich = emb_rich.transpose(1, 2).contiguous().view(B, T, C)
    
        return emb_rich

class BertSelfOutput(nn.Module):
    def __init__(self, config):
        super().__init__()
        self.dense = nn.Linear(config.emb_size, config.emb_size)
        self.dropout = nn.Dropout(config.dropout)
        self.LayerNorm = nn.LayerNorm(config.emb_size, eps=config.layer_norm_eps)
        
    def forward(self, emb_rich, emb):
        x = self.dense(emb_rich)
        x = self.dropout(x)
        x = x + emb
        out = self.LayerNorm(x)

        return out

class BertAttention(nn.Module):
    def __init__(self, config, layer_i):
        super().__init__()
        self.self = BertSelfAttention(config, layer_i)
        self.output = BertSelfOutput(config)

    def forward(self, emb, att_mask):
        emb_rich = self.self(emb, att_mask)
        out = self.output(emb_rich, emb)

        return out

셀프-어텐션 메커니즘은 세 가지 클래스로 구성된다.

BertSelfAttention: self-attention 구현을 담당한다
BertSelfOutput: BertSelfAttention 출력에 다양한 작업을 적용한다.
BertAttention: 위의 두 모듈을 보관하여 순서대로 실행할 수 있다.

BERT는 다중 헤드 어텐션(multi-headed attention)이라는 것을 사용한다. 이는 서로 독립적으로 작동하는 여러 개의 자기 주의 메커니즘이다. 각 트랜스포머 레이어는 12개가 있다. 각 헤드의 크기는 원래 임베딩 벡터 크기를 헤드 수로 균등하게 나눈 값이다. self-attention의 출력은 BertSelfOutput 클래스에서 추가로 처리된다. 

위치별 피드포워드 네트워크는 트랜스포머 계층의 두 번째 주요 구성 요소이며, 학습 가능한 추가 매개변수를 사용하여 모델 성능을 늘리는 역할을 한다. 

ReLU와 같은 다른 활성화 함수에 비해 GeLU의 두 가지 장점은 다음과 같다. GeLU는 매끄럽고(모든 곳에서 미분 가능) 최적화와 수렴에 도움이 된다. 음수 입력의 경우 음수 기울기를 사용하여 역전파 중에 더 나은 정보 흐름을 허용하여 학습에 도움이 된다.

전체 트랜스포머 레이어는 BertLayer에 함께 모여 BertAttention, BertIntermediate 및 BertOutput이 순서대로 처리된다.
class BertIntermediate(nn.Module):
    def __init__(self, config):
        super().__init__()
        self.dense = nn.Linear(config.emb_size, config.intermediate_size)
        self.gelu = nn.GELU() 

    def forward(self, att_out):
        x = self.dense(att_out)
        out = self.gelu(x)

        return out


class BertOutput(nn.Module):
    def __init__(self, config):
        super().__init__()
        self.dense = nn.Linear(config.intermediate_size, config.emb_size)
        self.dropout = nn.Dropout(config.dropout)
        self.LayerNorm = nn.LayerNorm(config.emb_size, eps=config.layer_norm_eps) 

    def forward(self, intermediate_out, att_out):
        x = self.dense(intermediate_out)
        x = self.dropout(x)
        x = x + att_out
        out = self.LayerNorm(x)

        return out 

BertForSequenceClassification 클래스는 BERT 모델을 인스턴스화하기 위해 호출하는 가장 바깥쪽 클래스이다. 여기에는 기본 아키텍처(self.bert)와 분류 헤드(self.classifier)가 모두 있다.
class BertLayer(nn.Module):
    def __init__(self, config, layer_i):
        super().__init__()
        self.attention = BertAttention(config, layer_i)
        self.intermediate = BertIntermediate(config)
        self.output = BertOutput(config) 

    def forward(self, emb, att_mask):
        att_out = self.attention(emb, att_mask)
        intermediate_out = self.intermediate(att_out)
        out = self.output(intermediate_out, att_out)

        return out

class BertPooler(nn.Module):
    def __init__(self, config):
        super().__init__()
        self.dense = nn.Linear(config.emb_size, config.emb_size)
        self.tanh = nn.Tanh()

    def forward(self, encoder_out):
        pool_first_token = encoder_out[:, 0]
        out = self.dense(pool_first_token)
        out = self.tanh(out)
        return out

class BertModel(nn.Module):
    def __init__(self, config):
        super().__init__()
        self.embeddings = BertEmbeddings(config)
        self.encoder = BertEncoder(config)
        self.pooler = BertPooler(config)

    def forward(self, input_ids, token_type_ids, att_mask):
        emb = self.embeddings(input_ids, token_type_ids)
        out = self.encoder(emb, att_mask)
        pooled_out = self.pooler(out)
        return out, pooled_out

class BertForSequenceClassification(nn.Module):
    def __init__(self, config):
        super().__init__()
        self.config = config
        self.bert = BertModel(config)
        self.dropout = nn.Dropout(config.dropout)
        self.classifier = nn.Linear(config.emb_size, config.n_classes)

    def forward(self, input_ids, token_type_ids, attention_mask=None):
        _, pooled_out = self.bert(input_ids, token_type_ids, attention_mask)
        pooled_out = self.dropout(pooled_out)
        logits = self.classifier(pooled_out)
        
        if self.config.return_pooler_output:
            return pooled_out, logits
        
        return logits

출력은 각 클래스에 대해 하나의 값이 있는 로짓이다. 이러한 로짓의 최대값을 취하면 예측된 클래스를 얻을 수 있다. 그러나 로짓을 확률로 해석하려면 softmax 함수를 적용해야 한다.

마무리
BERT이외에도, 허깅페이스의 transformers 는 다음과 같은 사전학습 모델을 로딩해, 파인튜닝할 수 있다. 
  • RoBERTa: Robustly optimized BERT approach
  • XLNet: Bidirecftional context support
  • GPT: Generative Pretrained Transformer
  • T5: Text to text transfer transformer
  • ELECTRA: Effeciently learning an encoder that classifiers token replacements accurately
  • ALBERT: A Lite BERT
  • DistilBERT: smaller version of BERT using distillation techniques

레퍼런스