분산 메시지 스크리밍 플랫폼 카프카
카프카는 대용량 메시지 발행-구독 서버로 사용된다. 아파치 소프트웨어재단이 2011년 오픈소스로 공개한 카프카는 비즈니스 구인구직 소셜 네트워크 서비스인 링크드인(LinkedIn) 수석 엔지니어 제이 크렙스(Jay Kreps)가 개발했다.
많은 웹 서비스가 다음 그림과 같이 메시지 발행(producer)-구독(consumer) 패턴을 가지는 데 카프카는 이런 메시지를 큐(queue) 자료구조로 관리하며, 빠른 속도로 메시지 데이터를 저장한 후 사용할 수 있는 기능을 제공한다.
카프카 발행-구독 서버(Apache Kafka documentation)
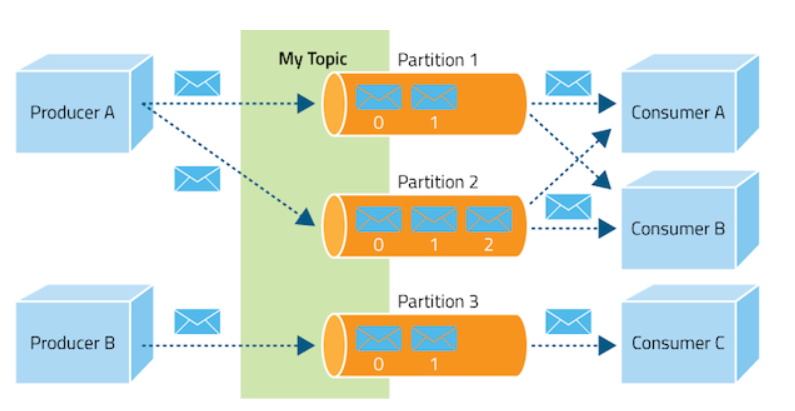
토픽(topic. 주제)은 다음과 같은 토픽별 파티션(partition)에 저장된다.
카프카 주제(토픽) 생성-소비 및 파티션 구조(https://www.cloudera.com/documentation/kafka/1-2-x/topics/kafka.html)
토픽이 만들어지면, 데이터는 파티션에 다음 같은 큐(queue) 형식으로 기록된다. 이를 생성된 순서대로 각 소비자가 읽을 수 있다.
카프카 메시지큐(www.confluent.io/blog/tutorial-getting-started-with-the-new-apache-kafka-0-9-consumer-client)
다음은 카프카 파티션에 저장되는 메시지 큐 자료 구조를 좀 더 명확히 보여준 것이다. 그림에서 offset은 소비자(consumer)가 현재 읽고 있는 메시지를 참조할 때 사용되는 참조번호가 된다. 소비자가 토픽의 메시지를 읽을 때 마다, current position 은 하나씩 증가하고, 얻어온 데이터는 청크 저장소(Chunk store)에 다음 그림과 같이 저장된다.
카프카 구조는 간단하나, 카프카 개발팀은 데이터 스트리밍을 고속으로 처리하기 위해, 이런 자료 구조를 메모리 상에서 관리하며, 적당할 때 하드디스크로 고속 저장(swap)하고 불러오는 과정을 효율적으로 개발했다.
고가용성 분산 코디네이션 지원 ZooKeeper
카프카는 고가용성을 위해 분산 코디네이션 기능을 지원하는 아파치 ZooKeeper(주키퍼) 와 함께 사용된다. 주키퍼는 쓰기 동작 시 분산된 카프카 클라리언트들 간 동기화 처리를 해준다.
주키퍼 쓰기 요청 시 동작(Zookeeper: A Wait-Free Coordination Kernel)
ZooKeeper znodes(Zookeeper: A Wait-Free Coordination Kernel)
각종 센서 및 다양한 말단에서 수집되는 대용량 데이터를 적절히 분산 저장 및 관리하기 위해 앞서 설명한 카프카가 사용되는 경우는 많다. 카프카는 분산 처리를 위해 다음 그림처럼 주키퍼를 함께 사용한다.
카프카와 주키퍼 관계(Log Transport and Distribution with Apache Kafka 0.8: Part II of “Scalable and Robust Logging for Web Applications”)
카프카의 효율적인 디스크 쓰기 알고리즘으로 인해 다음 그림과 같이 메시지 처리 성능은 매우 좋다고 알려져 있으며, 네이버 LINE 등에서 초당 4 GB 메시지 처리를 지원하는 핵심인 컴포넌트로 사용되고 있다(참고).
다음과 같은 순서로 설치한다.
윈도우 버전은 bin/windows 폴더 내에 실행 배치파일이 있다. 이제 다음과 같이 각 콘솔에서 주키퍼 서버를 실행한다. 실행 시 설치 경로는 적절히 수정한다.
c:\kafka\bin\windows\zookeeper-server-start.bat ../../config/zookeeper.properties
다음과 같이 카프카 서버를 실행한다.
c:\kafka\bin\windows\kafka-server-start.bat ../../config/server.properties
c:\kafka\bin\windows\kafka-console-producer.bat --broker-list localhost:9092 --topic test20200316
다음과 같이 메시지 consumer를 실행하면, 앞서 입력된 메시지가 구독되는 것을 확인할 수 있을 것이다.
c:\kafka\bin\windows>kafka-console-consumer.bat
MongoDB, 카프카 활용 파이썬 코딩
pip install kafka-python
pip install pymongo
kafka_server.py 파일을 아래와 같이 코딩한다.
from time import sleep
from json import dumps
from kafka import KafkaProducer
producer = KafkaProducer(bootstrap_servers=['localhost:9092'],
value_serializer=lambda x: dumps(x).encode('utf-8'))
for e in range(1000):
data = {'number' : e}
producer.send('numtest', value=data)
sleep(5)
kafka_consumer.py 파일을 아래와 같이 코딩한다. auto_off_reset에 earliest 로 설정해 커밋된 최신 오프셋에서 메시지 기록을 읽기를 시작한다. 만약, latest로 설정하면 로그 끝에서 읽기 시작할 것이다. enable_auto_commit을 true로 하면 소비가자 매 간격마다 읽기 오프셋을 커밋하게 된다. group_id는 소비자가 속한 그룹을 정의한 것이다. value_deserializer는 데이터를 json 형식으로 변환한다.
from kafka import KafkaConsumer
from pymongo import MongoClient
from json import loads
consumer = KafkaConsumer(
'numtest',
bootstrap_servers=['localhost:9092'],
auto_offset_reset='earliest',
enable_auto_commit=True,
group_id='my-group',
value_deserializer=lambda x: loads(x.decode('utf-8')))
client = MongoClient('localhost:27017')
collection = client.numtest.numtest
for message in consumer:
message = message.value
collection.insert_one(message)
print('{} added to {}'.format(message, collection))
콘솔창에서 다음과 같이 각각 실행한다.
python kafka_server.py
python kafka_consumer.py
그럼 다음처럼 5초마다 'numtest'토픽이름으로 데이터가 생성되어, consumer에게 전달되는 것을 확인할 수 있다.
카프카 생성 메시지 pub-sub
MongoDB를 실행해 database를 연결하면, 다음과 같이 kafka에서 생성된 데이터가 저장된 것을 확인할 수 있다.
몽고DB의 카프카 생성 데이터 뷰
이런 방식으로 IoT 센서, 메신저, SNS 메시지 등 대용량으로 생성되는 빅데이터를 카프카에서 모아, NoSQL DB로 저장하거나, 스파크(spark)로 분석해 NoSQL DB로 저장하는 등의 작업을 쉽게 처리할 수 있다.
기타 명령
- 토픽 생성 명령: kafka-topics.bat --create --zookeeper localhost:2181 --replication-factor 1 --partitions 1 --topic <topic name>
- 토픽 목록 확인: kafka-topics.bat --list --zookeeper localhost:2181
마무리
카프카는 IoT 장치, node-red 와 같은 데이터 토픽을 발생하는 데이터 스트리밍 파이프라인을 구성하는 데 중요한 역할을 할 수 있다. 카프카는 빅데이터 분석을 지원하는 스파크(spark)와도 연동되어 사용되기도 한다. 카프카는 고가용성과 대용량 데이터 분산처리가 필요한 경우에 효과적이다. 아울러, 파이썬, nodejs 등을 이용해 카프카, 스파크 등을 사용할 수 있어 편리하다.
참고: 주키퍼 설정 수정
압축 해제한 카프카 폴더의 config 폴더에서 다음과 같이 해당 파일을 수정한다.
# zookeeper.properties
# The directory where the snapshot is stored.
dataDir=/tmp/zookeeper
# the port at which the clients will connect
clientPort=2181
# disable the per-ip limit on the number of connections since this is a non-production config
maxClientCnxns=0
# server.properties
############################# Zookeeper #############################
# Zookeeper connection string (see zookeeper docs for details).
# This is a comma separated host:port pairs, each corresponding to a zk
# server. e.g. "127.0.0.1:3000,127.0.0.1:3001,127.0.0.1:3002".
# You can also append an optional chroot string to the urls to specify the
# root directory for all kafka znodes.
zookeeper.connect=localhost:2181
# Timeout in ms for connecting to zookeeper
zookeeper.connection.timeout.ms=6000
############################# Log Basics #############################
# A comma separated list of directories under which to store log files
log.dirs=/tmp/kafka-logs
- Install Apache Kafka on Windows 10
- Installing Apache Kafka on Windows
- kafka-python 2.0.1
- Traffic Data Monitoring Using IoT, Kafka and Spark Streaming
- Building Real-Time Analytics Dashboard Using Apache Spark
- node-red-contrib-spark
- Building a real-time data streaming app with Apache Kafka
- Getting Started with PySpark on Windows
- Apache Kafka Introduction
- Kafka quickstart
- RPi based Kafka
- Raspberry Pi streaming demo with Standalone Kafka


댓글 없음:
댓글 쓰기