이 글은 우분투 20.04기반 YOLO v5 설치 및 사용 방법을 간단히 기술한다. YOLO v5는 PyTorch기반으로 동작하며, 기존 YOLO v3보다 객체 인식 속도 및 품질이 크게 개선되었다.

YOLO v5 성능
2020년 불과 몇 개월 사이에 YOLO v4, YOLO v5 및 PP-YOLO라는 세 가지 주요 버전의 YOLO가 릴리즈되었다. YOLO v5는 YOLO 개발자가 개발한 것이 아니기에 사람들사이에서 논쟁거리가 있었다. 하지만, 결론적으로 여러가지 성능향상이 있었기에, 많은 사람들이 v5 버전을 사용하고 있다. 참고로, 욜로 버전 역사는 다음과 같다.
- Joseph Redmon의 YOLO 버전
버전 1: 통합 된 실시간 객체 감지(2016)버전 2: 더 좋고, 더 빠르고, 더 강력함(2017)버전 3: 점진적 개선(2018)
- Joseph Redmon의 컴퓨터 비전 연구 중단 발표(2020.2)
- Alexey Bochkovskiy의 YOLO 버전
버전 4: Darknet 기반 Tesla V100에서 65FPS의 실시간 속도. COCO 데이터 세트에서 43.5%의 AP값 획득
- Glenn Jocher의 YOLO 버전(2020.5)
버전 5: Darknet의 포크가 아닌, PyTorch 구현. 모자이크 데이터 확대 및 자동 학습 경계 상자 앵커가 포함됨. Tesla P100에서, 이미지 당 0.007 초 객체 예측. 평균 140 FPS 주장.
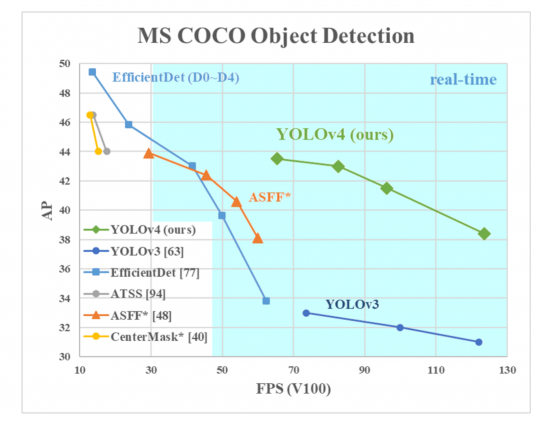
YOLO v4 성능
개발환경 설치
다음 순서로 개발 환경을 설치한다.
- Install Ubuntu 20.04
- Install NVIDIA, CUDA, Tensorflow, Keras, Jupyter notebook
이제, 텐서플로우나 케라스 예제 코드가 쥬피터 노트북에서 제대로 실행되면 환경 설정 성공한 것이다.
import tensorflow as tf
print(tf.reduce_sum(tf.random.normal([1000, 1000])))
import tensorflow as tf
print("# GPUs Available: ", len(tf.config.experimental.list_physical_devices('GPU')))

YOLO v5 설치
버전5는 원 개발자가 아닌 PyTorch로 YOLO개발했던 개발자가 맡아 진행한 것이다. 그러므로, PyTorch를 사용한다. 이에 대한 상세한 스토리는 여기를 참고한다. 다음을 참고해 욜로 버전5를 설치한다.
이제 YOLO 설치 폴더에서 다음 명령을 입력한다.
python3 detect.py --source https://www.youtube.com/watch?v=7HaJArMDKgI
다음과 같이 객체 인식 처리가 되면 성공한 것이다.


주요 코드 분석
주요 코드를 분석해 본다. 동작은 다음과 같다.
import torch.distributed as dist #파이토치 임포트
import torch.nn as nn
...
from models.yolo import Model # 욜로 모델 임포트
def train(hyp, opt, device, tb_writer=None):
# 설정
if rank in [-1, 0]:
opt.hyp = hyp # 하이퍼 파라메터 추가
run_id = torch.load(weights).get('wandb_id') if weights.endswith('.pt') and os.path.isfile(weights) else None
if wandb_logger.wandb:
weights, epochs, hyp = opt.weights, opt.epochs, opt.hyp # WandbLogger might update weights, epochs if resuming
nc = 1 if opt.single_cls else int(data_dict['nc']) # 클래스 수
names = ['item'] if opt.single_cls and len(data_dict['names']) != 1 else data_dict['names'] # class names
# 모델 정의
pretrained = weights.endswith('.pt')
if pretrained:
with torch_distributed_zero_first(rank):
attempt_download(weights) # download if not found locally
ckpt = torch.load(weights, map_location=device) # 체크 모델 로드
model = Model(opt.cfg or ckpt['model'].yaml, ch=3, nc=nc, anchors=hyp.get('anchors')).to(device) # create
model.load_state_dict(state_dict, strict=False) # 모델 로딩
else:
model = Model(opt.cfg, ch=3, nc=nc, anchors=hyp.get('anchors')).to(device) # create
train_path = data_dict['train']
test_path = data_dict['val']
# 최적화
nbs = 64 # nominal batch size
accumulate = max(round(nbs / total_batch_size), 1) # accumulate loss before optimizing
hyp['weight_decay'] *= total_batch_size * accumulate / nbs # scale weight_decay
pg0, pg1, pg2 = [], [], [] # optimizer parameter groups
if opt.adam: # 최적화 함수
optimizer = optim.Adam(pg0, lr=hyp['lr0'], betas=(hyp['momentum'], 0.999)) # adjust beta1 to momentum
else:
optimizer = optim.SGD(pg0, lr=hyp['lr0'], momentum=hyp['momentum'], nesterov=True)
if opt.linear_lr:
lf = lambda x: (1 - x / (epochs - 1)) * (1.0 - hyp['lrf']) + hyp['lrf'] # linear
else:
lf = one_cycle(1, hyp['lrf'], epochs) # cosine 1->hyp['lrf']
scheduler = lr_scheduler.LambdaLR(optimizer, lr_lambda=lf)
# plot_lr_scheduler(optimizer, scheduler, epochs)
# EMA
ema = ModelEMA(model) if rank in [-1, 0] else None
start_epoch, best_fitness = 0, 0.0
if pretrained:
# Epochs
start_epoch = ckpt['epoch'] + 1
if opt.resume:
assert start_epoch > 0, '%s training to %g epochs is finished, nothing to resume.' % (weights, epochs)
del ckpt, state_dict
# Image sizes
imgsz, imgsz_test = [check_img_size(x, gs) for x in opt.img_size] # verify imgsz are gs-multiples
# 모델 파라메터
hyp['box'] *= 3. / nl # scale to layers
hyp['cls'] *= nc / 80. * 3. / nl # scale to classes and layers
hyp['obj'] *= (imgsz / 640) ** 2 * 3. / nl # scale to image size and layers
hyp['label_smoothing'] = opt.label_smoothing
model.nc = nc # attach number of classes to model
model.hyp = hyp # attach hyperparameters to model
model.gr = 1.0 # iou loss ratio (obj_loss = 1.0 or iou)
model.class_weights = labels_to_class_weights(dataset.labels, nc).to(device) * nc # attach class weights
model.names = names
for epoch in range(start_epoch, epochs): # epoch
model.train() # 모델 훈련
for i, (imgs, targets, paths, _) in pbar: # 배치 -------------------------------------------------------------
ni = i + nb * epoch # number integrated batches (since train start)
imgs = imgs.to(device, non_blocking=True).float() / 255.0 # uint8 to float32, 0-255 to 0.0-1.0
detect.py 주요 코드는 다음과 같다.
def detect(save_img=False):
source, weights, view_img, save_txt, imgsz = opt.source, opt.weights, opt.view_img, opt.save_txt, opt.img_size
save_img = not opt.nosave and not source.endswith('.txt') # save inference images
webcam = source.isnumeric() or source.endswith('.txt') or source.lower().startswith(
('rtsp://', 'rtmp://', 'http://', 'https://'))
# 초기화
device = select_device(opt.device)
half = device.type != 'cpu' # half precision only supported on CUDA
# 모델 로드
model = attempt_load(weights, map_location=device) # load FP32 model
stride = int(model.stride.max()) # model stride
imgsz = check_img_size(imgsz, s=stride) # check img_size
# 클래스 이름 및 색상
names = model.module.names if hasattr(model, 'module') else model.names
colors = [[random.randint(0, 255) for _ in range(3)] for _ in names]
# 예측 실행
if device.type != 'cpu':
model(torch.zeros(1, 3, imgsz, imgsz).to(device).type_as(next(model.parameters()))) # run once
t0 = time.time()
for path, img, im0s, vid_cap in dataset:
img = torch.from_numpy(img).to(device)
img = img.half() if half else img.float() # uint8 to fp16/32
img /= 255.0 # 0 - 255 to 0.0 - 1.0
if img.ndimension() == 3:
img = img.unsqueeze(0)
# Inference
t1 = time_synchronized()
pred = model(img, augment=opt.augment)[0]
# Apply Classifier
if classify:
pred = apply_classifier(pred, modelc, img, im0s) # 객체 인식 예측
# 객체 탐지 프로세스
for i, det in enumerate(pred): # detections per image
p = Path(p) # to Path
save_path = str(save_dir / p.name) # img.jpg
gn = torch.tensor(im0.shape)[[1, 0, 1, 0]] # normalization gain whwh
if len(det):
# Rescale boxes from img_size to im0 size
det[:, :4] = scale_coords(img.shape[2:], det[:, :4], im0.shape).round()
# Stream results
if view_img:
cv2.imshow(str(p), im0)
cv2.waitKey(1) # 1 millisecond
if __name__ == '__main__':
parser = argparse.ArgumentParser() # 객체 탐지 예측 파라메터 정의
parser.add_argument('--weights', nargs='+', type=str, default='yolov5s.pt', help='model.pt path(s)')
parser.add_argument('--source', type=str, default='data/images', help='source') # file/folder, 0 for webcam
parser.add_argument('--img-size', type=int, default=640, help='inference size (pixels)')
parser.add_argument('--conf-thres', type=float, default=0.25, help='object confidence threshold')
parser.add_argument('--iou-thres', type=float, default=0.45, help='IOU threshold for NMS')
parser.add_argument('--device', default='', help='cuda device, i.e. 0 or 0,1,2,3 or cpu')
parser.add_argument('--view-img', action='store_true', help='display results')
parser.add_argument('--save-txt', action='store_true', help='save results to *.txt')
parser.add_argument('--save-conf', action='store_true', help='save confidences in --save-txt labels')
parser.add_argument('--nosave', action='store_true', help='do not save images/videos')
parser.add_argument('--classes', nargs='+', type=int, help='filter by class: --class 0, or --class 0 2 3')
parser.add_argument('--agnostic-nms', action='store_true', help='class-agnostic NMS')
parser.add_argument('--augment', action='store_true', help='augmented inference')
parser.add_argument('--update', action='store_true', help='update all models')
parser.add_argument('--project', default='runs/detect', help='save results to project/name')
parser.add_argument('--name', default='exp', help='save results to project/name')
parser.add_argument('--exist-ok', action='store_true', help='existing project/name ok, do not increment')
opt = parser.parse_args()
print(opt)
check_requirements(exclude=('pycocotools', 'thop'))
with torch.no_grad():
if opt.update: # update all models (to fix SourceChangeWarning)
for opt.weights in ['yolov5s.pt', 'yolov5m.pt', 'yolov5l.pt', 'yolov5x.pt']: # 가중치에 따른 예측
detect()
strip_optimizer(opt.weights)
else:
detect()
마무리
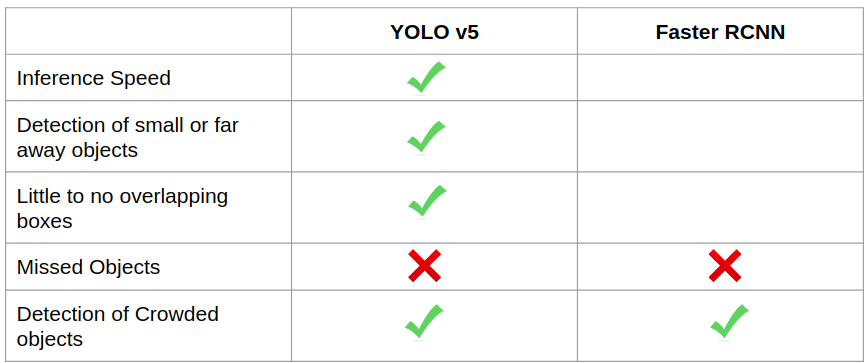
YOLO v5는 실행 속도 측면에서 분명한 이점이 있다. YOLO v5 모델은 작은 개체를 감지하는 데 더 나은 성능을 보이면서, 빠르게 실행된다. 다음은 다른 딥러닝 모델과 성능 차이를 나타낸다.
안녕하세요! ubuntu 설치를 USB를 통해서 하는 방법으로 알려주셨는데 혹시 윈도우 컴퓨터에서 Microsoft store를 통해서 ubuntu 20.04 lts를 설치하는 방법으로도 가능한가요?
답글삭제아래 링크 참고하시길 바랍니다.
삭제https://www.itzgeek.com/post/how-to-install-ubuntu-20-04-alongside-with-windows-10-in-dual-boot/
https://ubuntu.com/tutorials/ubuntu-on-windows#4-install-ubuntu-for-windows-10
image subset(roi)에서만 detection하려면 코드 어디를 수정해야 될까요?
답글삭제